The Americans with Disabilities Act was created in 1990 with one goal: to prohibit unjustified discrimination based on disability. This act requires employers to make reasonable accommodations to employees with disabilities and also requires accessibility for public accommodations.
ADA Signage: Bead it—Just Bead It
Create ADA Signage with Raster® System
By Terri Bristow, Gravotech
The Americans with Disabilities Act was created in 1990 with one goal: to prohibit unjustified discrimination based on disability. This act requires employers to make reasonable accommodations to employees with disabilities and also requires accessibility for public accommodations.
One aspect of these public accommodations relates directly to our industry: the creation of ADA-compliant signage. Many personalization businesses create ADA-compliant signage because they already have the equipment, suppliers, and customers.
ADA signage fabrication can bring a new revenue stream to a personalization business. One of the most popular methods is the Raster® Braille System, licensed through Accent Signage and available for purchase from Gravotech.
You’ll Need:
- Two pieces of impact modified acrylic; one should be adhesive-backed like the Gravotac™ we’re using
- A computer-driven rotary engraving or routing machine
- Drill bit
- Raster Braille System
ADA Signage Can Be Created in Five Simple Steps!
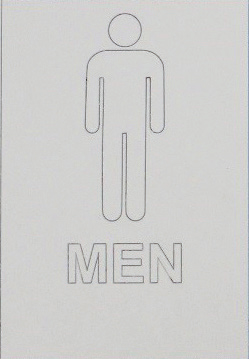
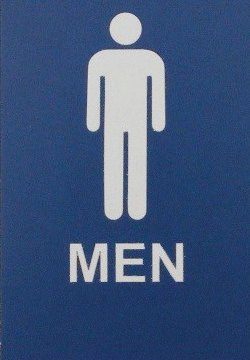
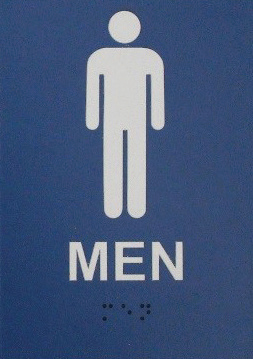
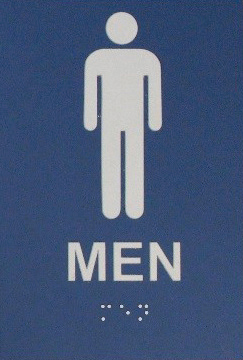
Step 1: Use two pieces of plastic in contrasting colors. ADA signage mandates high contrast colors for the visually impaired, but does not give specifics of what is and isn’t compliant, and your software won’t tell you what combinations are allowed. We’ll use white and blue Gravotac.
ADA guidelines state the “profile” material (which will make up the raised lettering and pictogram) must be exactly 1/32 in. thick and the “backer” material that makes up the back of the sign must be at least 1/16 in. thick. Adhesive is used to attach the profile material to the backer.
We’re using a 1/32-in.-thick profile piece of Gravotac with adhesive and a 1/16-in.-thick piece of Gravotac without adhesive. The inset photo shows the uncut white profile material, which fully covers the blue backer.
Step 2: It is time to cut out the pictogram and lettering from the profile substrate. You can use the computer-driven rotary engraver or routing machine or, optionally, a laser engraver. Gravostyle works with both types of machines. The operator creates a layout in the software system using a pictogram and all capital letter text. The pictograms should be available in a library through an ADA module of your equipment’s software. The text height must be between 5/8 and 2 in. This layout is then sent to the machine to cut to a precise depth—cutting through the profile material to create the pictogram and text. In the example, you can see the lines cut through the profile material. The precise depth is needed so only the profile material is cut. The backer plate should remain intact.
Step 3: Remove—or “weed”—the excess 1/32-in. profile material to leave behind only the pictogram and letters on the backer. Simply peel off the profile layer, starting from a corner. The majority of the plastic should easily come off. Special weeding tools and cleaning brushes can be used to remove stubborn pieces, such as the insides of letters like A,B, D, O, P, Q, and R.
Step 4: Use the computer-driven rotary engraver or routing machine to drill the braille dot pockets that will hold the Raster beads. The placement will be determined by your braille translation software. At this point, the quality and precision of both the machine and software system are key, because there are extremely strict guidelines that mandate the placement of each raised dot in braille. See the sidebar for details. Depending on the equipment you are using, you may have an option to make Step 4 and Step 5 seamless. For instance, Gravograph’s Gravostyle software takes the guesswork out of the pockets’ placement and depth for the Raster beads and can place the beads automatically.
Step 5: Create the raised braille dots by inserting the Raster beads into the braille pockets that were just created. This can be done manually with a special Raster pen or automatically by the engraving machine. The manual option is less expensive and might be a good fit for a manufacturer who only makes a few signs a year, but the automated option could save the high volume fabricator valuable time and money. With the automatic option, the machine moves directly over the drilled pockets and inserts the Raster beads.
Expert Tip
Work quickly from Step 1 to Step 3. This will prevent the adhesive from curing fully, allowing the two materials to separate with ease and minimal residual residue.
Watch the Process Online and Download Your ADA Sign Guide
Watch the creation of an ADA sign on a Gravograph IS8000.
Download “The Complete ADA Signage Guide”.
DISTANCING THE DOTS
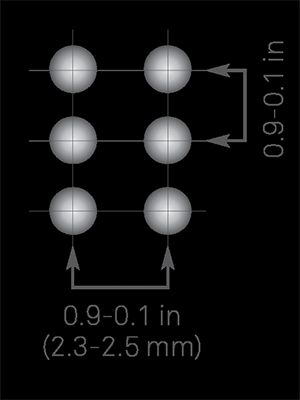
Braille is made up of cells. Each cell can
contain six dots; three on the left, and three
on the right.
For braille to be understood by a reader,
it is essential that the dots are uniform in
size and in the appropriate position. One
misplaced Raster® bead can dramatically
change the meaning of an important message. It’s crucial to
use a trusted Grade 2 braille translation software to prevent
mistakes.
This software often is available through your existing
equipment or signage material suppliers. Gravotech’s
Gravostyle™ software, for instance, both runs rotary and laser
engravers but also can be used to accurately translate sign
text to braille.
You must follow these ADA guidelines:
- Unlike the raised lettering, braille is required to be
lowercase. “The indication of uppercase letter(s) shall only
be used for proper nouns and names, individual letters of
the alphabet, initials, acronyms, or before the first word of
sentences,” the law specifies.
- Dot height must be 0.025–
0.037 in. (0.6–0.9 mm).
- The diameter of the dot base
must be 0.0590–0.063 in.
(1.5–1.6 mm).
- The distance between any two
dots in same cell (measured
from center to center) must be
0.9–0.1 in. (2.3–2.5 mm).
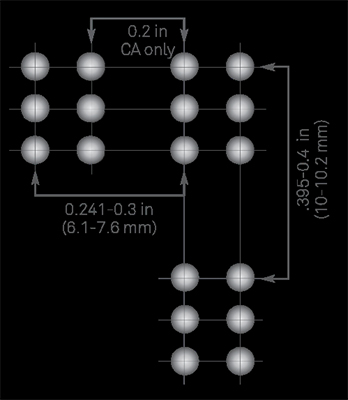
- The distance between
corresponding dots
in adjacent cells
(measured from
center to center)
must be 0.241–0.3
in. (6.1–7.6 mm)
- The distance
between
corresponding dots
from one cell to
the cell directly
below (measured
from center to
center) must be
0.395–0.4 in.
(10–10.2 mm).
Terri Bristow is a marketing specialist at Gravotech in Duluth, GA. The company has been in the business of helping awards and personalization retailers since 1938. Since that time, Gravotech has grown to manufacture laser, rotary, and plastic materials. ADA signage has always been at the top of the innovation list to make accessibility available to all persons and to help businesses add a profitable product. Gravotech manufactures many machines to create ADA signage in various price ranges to fit every budget. Training sessions from Gravotech can be set up to learn the ins and outs of ADA signage fabrication. Contact your local representative and schedule your personal demo today. Call 800.843.7637, e-mail web@us.gravotech.com, or visit www.gravotech.us.