Achieving a perfect, polished, laser-cut acrylic edge can be
a challenging task for even the most advanced laser users
because there are number of variables involved. You must
use a high-quality acrylic appropriate for your application;
determine the correct power, speed, and frequency settings;
and select a suitable lens and table configuration, just to
name a few. Below is a how-to guide to help any laser user
achieve a flame-polished edge when laser
cutting acrylic.
On Fire!
How to Achieve Flame-Polished Edges with Acrylic Processing
By Josh Stephens, Senior Applications Engineer, Trotec Laser
(Originally published in the October 2016 issue of Insights).
Achieving a perfect, polished, laser-cut acrylic edge can be
a challenging task for even the most advanced laser users
because there are number of variables involved. You must
use a high-quality acrylic appropriate for your application;
determine the correct power, speed, and frequency settings;
and select a suitable lens and table configuration, just to
name a few. Below is a how-to guide to help any laser user
achieve a flame-polished edge (FIGURE 1) when laser
cutting acrylic.
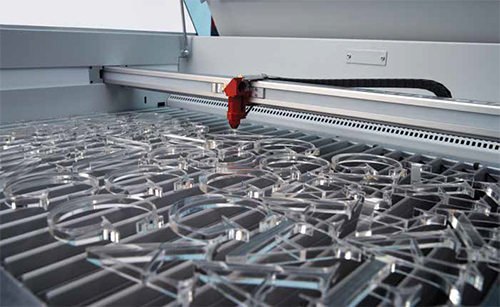
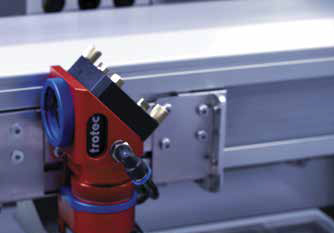
The removable lamellas above help prevent acrylic pieces, especially intricate ones like the letters shown, from moving or slipping during cutting.
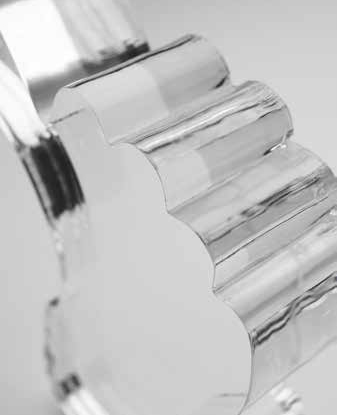
FIGURE 1: A flame-polished edge lends any acrylic product a crafted,
high-end feel perfect for elevating recognition products and personal or
corporate gifts.
Material Preparation
First and foremost, achieving a flame-polished edge
depends heavily on the quality and type of acrylic being
cut. It’s important to have the correct materials before
attempting a flame-polished edge. Don’t be afraid to contact
your materials vendor or applications support personnel
from the company where you purchased your laser if you
have questions.
Many people ask me, “Prior to processing the acrylic,
should I leave the film on or off? What about paper
backing?” In general, you should leave the film on the
acrylic to protect the material during cutting. On the other
hand, if you are engraving or using small or thin parts,
you should take the film off to reduce the risk of flareups.
When processing acrylics with paper backing, at a minimum, you always should remove the paper from the
top side. However, it may be necessary to remove the paper
from both sides because the paper contains paraffin, which
causes flaming and reduces the cutting-edge quality.
Laser Power
As a general rule, more power yields better results. A
good rule of thumb for achieving a polished cut and good
production speed is to use 10 watts per 0.04 in. (1 mm).
Sixty watts can process ½ in. (12 mm); however, it will be
slower and the quality will be poorer. Your method also may
depend on your preferences. For example
- 400 watts for 1/8 in. (3 mm) = fastest speeds
- 400 watts for 1 in. (25 mm) = best quality
Frequency and Speed Settings
The correct frequency settings will depend on the material
you are using. You should start high on cast acrylic (10 to
20 khz) and lower on extruded (2 to 5 khz). Decreasing the
frequency means there will be fewer pulses, which results
in less energy in the material. This causes
- less flaming
- less boiling (which results from too much heat building in
the material)
- slower cutting speed
To achieve a flame-polished cut, you should set your speed
to less than 2/5 in./second (I suggest 600 mm/min.). For
best results on a separation cut, use maximum power and
maintain maximum frequency.
Lens and Focus
Determining which lens to use depends on the thickness of
the acrylic. For materials with a thickness of ¾ in. (20 mm)
or less, you should use the 2½-in. lens. For materials larger
than ¾ in. (20 mm), it is optimal to use a 5-in. lens with a
200- or 400-watt laser system.
Here are some best practices regarding focus:
- Defocusing results in better beam usage.
- Do not defocus when material is less than ¼ in. (6 mm).
- For materials larger than ¼ in. (6 mm), defocus 1/3 into
the material. (Example: Cutting ½ in. z-offset should be
-0.17 in.)
- Defocus if the cut edge is not straight or wavy lines
appear at bottom of the cut edge.
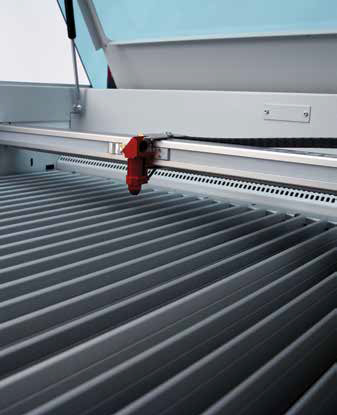
FIGURE 2: This worktable, used with a Speedy 400 laser, features
removable aluminum lamellas, which provide an excellent cutting surface for
most materials. However, when cutting acrylic, you may want to opt for acrylic
lamellas instead, which limit reflection of the laser.
Table Configuration
Your table configuration also should be determined
according to the size and thickness of the materials you
are processing. For parts larger than 4 in. (100 mm) or
thicknesses more than ¼ in. (6 mm), a cutting table with
acrylic lamellas (FIGURE 2) generally will produce the
best results. If you are processing parts smaller than 4 in.
(100 mm) or with thicknesses less than ¼ in. (6 mm), you
should use an acrylic grid on vacuum table (FIGURE 3) or a hard anodized cutting grid (FIGURE 4).
If you have a downdraft cutting table, you always should
make sure to cover any exposed working area to improve
suction beneath the acrylic. This is a key factor for better
results because it helps prevent air leaks and makes the
exhaust more efficient.
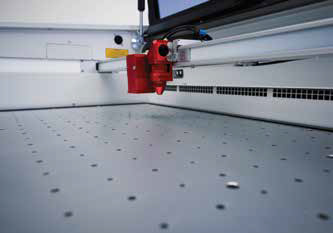
FIGURE 3: This vacuum table, used with a Speedy 300 laser, gently
fixes thin and lightweight materials to the worktable to prevent shifting during
processing. Adding an acrylic grid further helps prevent movement.
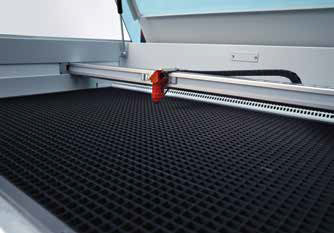
FIGURE 4: A hard cutting grid is ideal for most general cutting
applications because it helps keep even pieces smaller than 100 mm in a flat
position during and after cutting.
Exhaust and Gas
Exhaust plays a huge role in achieving flame-polished
edges (FIGURE 5). It is important to have downdraft
suction beneath the acrylic to evacuate the gases so they
do not become “trapped” in the cut kerf. Without adequate
exhaust, a quality cut is not possible. Negative pressure is
more important than airflow.
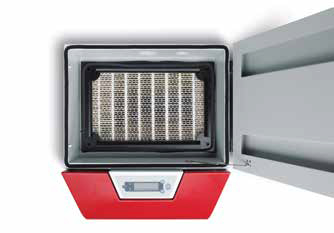
FIGURE 5: Filters like this example from the Atmos line of exhaust
systems are necessary to ensure a clear, polished look to the edges.
The exhaust significantly reduces flaming. A good acrylic
cut is hot and produces gases, and gases are highly
flammable. The exhaust transports gases away and thus
avoids the possibility of igniting the gases. It also controls
frosting of liquid acrylic. The exhaust creates airflow
through cut kerf, letting the acrylic melt from top to
bottom, which creates a smooth, flame-polished cut instead
of wavy horizontal lines.
You should use compressed air or standard air assist and
a large diameter nozzle to transport gasses away through
the exhaust. The pressure should be maximum 1.5 PSI (0.1
bar).
Everything from signange, like the room number sign shown above, to intricate art can be cut
from acrylic.
Post Processing
That’s the beauty of laser. Unless you are
joining acrylic pieces together, there really is
no post processing. However, joining acrylic
pieces can be challenging because laser
processing applies heat to the material, and
the heat stresses the material. To avoid micro
cracks when you are joining, you should
temper your material for a few hours at 80° C.
Then follow the joining guidelines suggested by
your acrylic manufacturer.
Resources
I recommend taking advantage of forums
and associations—like the Awards and
Personalization Association and the
Member2Member Forum—where you can
share your experiences, get advice from
other engravers, and take advantage of the
networking opportunities. And don’t be
afraid to reach out to your material and laser
providers for applications assistance.
Good luck!