I discussed the pros and cons of JPG and PNG files in the November 2014 and January 2015 issues of Recognition Review. Now that you know the two major bitmap file formats to consider and when each is best, we’re going to look at the best sizes to use when posting bitmaps online in a variety of scenarios.
Preparing Graphics for Online Use
Resize and Resample for Rewarding Results
Foster D. Coburn III, Corel Concepts
 I discussed the pros and cons of JPG and PNG files in the November 2014 and January 2015 issues of Recognition Review. Now that you know the two major bitmap file formats to consider and when each is best, we’re going to look at the best sizes to use when posting bitmaps online in a variety of scenarios.
Some of you may have cringed when I talked about putting bitmaps online because you don’t feel you are a web master. Even if you aren’t creating a website, you can help the people who do create sites by providing them with optimized graphics. It also is important to have a presence on the popular social media platforms to promote your business and products.
If you have a good working knowledge of CorelDRAW and Corel PHOTO-PAINT, creating bitmaps for online use takes only a few extra steps. Those extra steps can save you money—you won’t have to pay a web guru to do all the graphics for you and you’ll be marketing your business online to generate more income. You’ve got the software and the skills; let’s put them to use!
Product Photos for E-Commerce
It is common for even the smallest of businesses to have photos online of products they are selling. E-commerce is huge and will continue to grow. If you post the best possible photos of products, you’ll have the best chance for selling. Maybe you don’t have your own online store today. That could soon change, or you could sell products via Amazon, eBay, or Etsy.
If you take photos of products, get the best possible original you can at a high number of pixels. Some would call this high resolution, though that is a very misunderstood term. You’ll want to do everything possible to perfect those photos at the largest size possible. I discussed this photography and perfection process in the August 2013 issue of Recognition Review. Once they are perfected, we’ll prep them for placement in an online store.
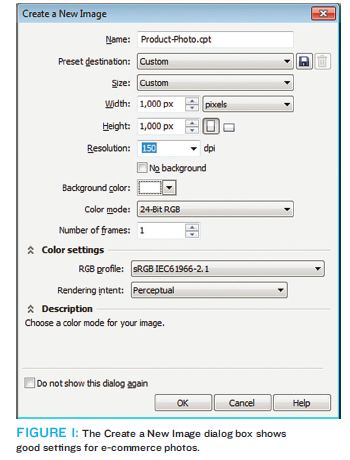
No matter the platform you use, some guidelines will be provided for what works best. I’m going to provide you specifications that should work in many scenarios. It is important to have a square image, and a good size to use is 1000 by 1000 pixels. Notice I did not mention inches and I didn’t include dots per inch (DPI). Those are not relevant, so please specify the size in pixels. As you must enter a DPI, feel free to use 150 as long as the number of pixels is exactly 1000 x 1000. FIGURE 1 shows the Create a New Image dialog box in Corel PHOTO-PAINT with the appropriate settings.
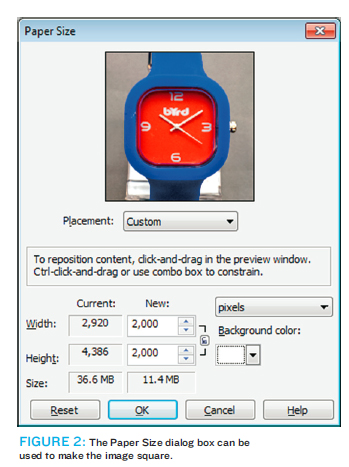 Typically, you’ll want the photos to have either no background or a white background. For example, Amazon photos must have a white background. Rather than creating a new image as shown in Figure 1, maybe you’ll use the Image Resample command or the Image Paper Size command on a photo to get the appropriate size. Your original photo is most likely not square so you’ll select Image | Paper Size in Corel PHOTO-PAINT (see FIGURE 2) to make the image square.
The original photo of the watch shown in Figure 2 was 2920 pixels wide by 4386 pixels tall. Using the settings shown in the dialog box, it was cropped to 2000 pixels square. Depending on the photo, you may choose a different square size. By choosing 2000, the product itself fills the frame well while leaving a bit of white space around the edges.
Before I resample the graphic, I’m going to use the masking tools in Corel PHOTO-PAINT to cut out the watch so there is no background at all. The masking process would require several articles to fully describe it so it is not included here.
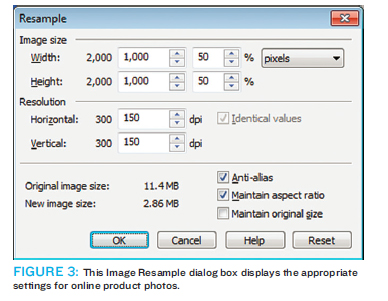
Once you have an image perfected at the largest size possible, save a copy! Should you ever need something larger than what you need now, you can always go back to this original. Our next step will be to resample the image to the 1000-pixel-by-1000-pixel size that is ideal for most scenarios today. Select Image | Resample and use the settings shown in FIGURE 3.
Note that I’m giving the procedures for 1000-pixel-by-1000-pixel size, but you can modify to a different size if you are giving specifications. I’m simply providing settings that should cover most uses, but each situation is different.

Anytime you resample an image to a smaller size, it is a good idea to apply some sharpening as resampling can make images a tad blurry. Select Effects | Sharpen | Unsharp Mask to get the dialog box shown in FIGURE 4 and use the settings shown.
When done, save the file in PNG and JPG formats. The PNG file will be large and have the highest quality. Typically I find the best balance between quality and size is to use the JPG for the product online. If you have a scenario in which the larger file size isn’t a problem, go for the PNG.
Graphics for Social Media
Once you work hard to get a good photo of your products, you’ll want to share that photo on social media. For this article, I’m only going to focus on Facebook and Twitter, though it isn’t hard to modify these instructions for other social platforms.
The large photo displayed in the Facebook News Feed as of this writing is 504 pixels by 504 pixels. Using the information provided earlier in this article, resample the image to exactly 504 pixels by 504 pixels and apply Unsharp Mask after resampling. Save the result in PNG format and post it to Facebook. There is no reason to save to JPG as Facebook will automatically convert the photo to JPG. If you start with a JPG, the quality will degrade more when Facebook does its processing.
Twitter has an optimal size that isn’t square: 880 pixels by 440 pixels. If it is really important to you, resample the product photo to 440 pixels by 440 pixels and then use Image | Paper Size to make the graphic 880 pixels by 440 pixels. In the extra space added, you could add a short description of the photo. In many cases, the best solution is to resample to 440 x 440 pixels and post that on Twitter. While it may not be optimal, it will still look great in the Twitter stream.
From Start to Finish
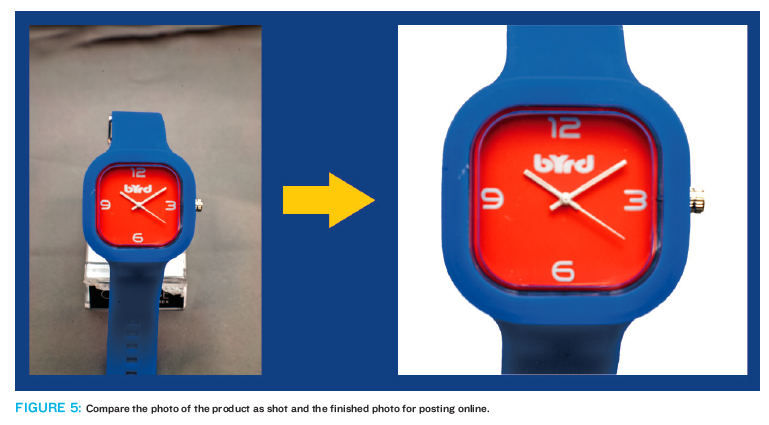
We started out with a photo of our product and through some basic manipulation, we turned it into a perfect photo for use online. FIGURE 5 shows the original and our finished photo so you can see the difference between the two. Taking a little time to set up the photo saved a lot of processing time after the photos were shot.
Now it is your turn to take this information and get some great photos of your products to put online!
Foster D. Coburn III is the author of 13 books on CorelDRAW, the latest being CorelDRAW X6 Unleashed. He also writes the free Graphics Unleashed Blog and provides fonts, artwork and add-ons of interest to designers through the Graphics Unleashed site at www.unleash.com. Connect with Graphics Unleashed on Facebook at www.facebook.com/graphicsunleashed and follow Foster on Twitter at @fostercoburn.