Members of the Awards and Personalization Association—
or really anyone in the industry—who do engraving for
industrial clients know that very often you’ll be sent .DXF
(drawing exchange file) files from AutoCAD (or other CAD
[computer-aided design] programs) containing shapes that
appear to be fillable but accept no fill in CorelDRAW.
Filling Vector Graphics from CAD
DXF files got you down? Expert Roy Brewer can help.
BY ROY BREWER, CRM, ENGRAVING CONCEPTS
Members of the Awards and Personalization Association—
or really anyone in the industry—who do engraving for
industrial clients know that very often you’ll be sent .DXF
(drawing exchange file) files from AutoCAD (or other CAD
[computer-aided design] programs) containing shapes that
appear to be fillable but accept no fill in CorelDRAW.
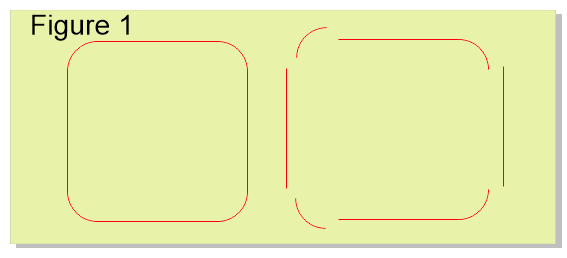
For instance, what appears to be a rounded corner
rectangle most often will actually be eight shapes: four
lines and four arcs as shown in FIGURE 1. Often we
need those shapes filled. But how can you fill them in
CorelDRAW?

DXF file
A .DXF file of FIGURE 2 above is available for download. To download the file, right click the link above and select "Save target as" or "Save link as." This
is the format most often used to create vector graphics
in CAD programs into second- or third-party software
programs like CorelDRAW.
Download the file, and import it into your version of
CorelDRAW. Select part of any shape and move it to confirm
that each segment is an object and therefore the shapes
cannot be filled. Then, undo any movements and try each
of the following options on the different shapes. You may
be surprised by which work and which don’t. Each of the
options will work on some graphics, but not others.
- Select all parts Combine, Join Curves,
then left-click on the desired color in the
color palette.
- Use the Smart Fill tool with the color
you designate.
- Before filling, select Tools > Options >
Document > General and check the Fill
Open Curves checkbox.
- Use Virtual Segment Delete tool using
the following steps.
- Select the Virtual Segment Delete
tool (from the Crop flyout menu).
- With the Shift key held down, drag a
marquee box around the shape or
shapes you want to fill.
- Now try filling! (While the R is still
selected in the stylized lettering,
click Combine to bring out the lost
“doughnut hole.”)
Roy Brewer, CRM, of Engraving Concepts in Arlington, TX,
entered the profession as a manufacturing representative in
1965. He founded his own company to supply the equipment
that makes dealers and engravers more productive. Our
association has honored his work with accolades that include
the Sales Rep of the Year, Speaker of the Year, President’s,
and Founders awards and induction into the Hall of Fame.
Visit www.EngravingConcepts.com to learn more.
For details about undocumented use of
the Virtual Segment Delete tool, check out
Jeff Harrison’s Jack of All Trades section of
Foster Coburn’s Graphics Unleashed blog
(http://graphics-unleashed.com) or watch
a video illustrating these tactics at www.youtube.com/watch?v=VONYvFEvgYk