Recently I received a call from Ken and Sue, a husband-and-wife team from Tennessee who were facing a unique challenge. They needed to modify a black and white illustration of a vintage aircraft so that it could be lasered on whiskey bottles destined for a museum fundraiser. The challenge? The aircraft in the foreground of the image was in shades of gray similar to the background, making it difficult to visually separate some parts of the airplane from the background. To compound the issue, the image needed to be converted to a halftone, which further reduced the definition between the plane and the background.
Dodge & Burn
A Step-by-Step Tutorial for Corel PHOTO-PAINT®
By Shon Roti, JDS Industries, Inc.
(Originally published in the December 2015 issue of Recognition Review.)
Challenging questions generally bring insight.
Recently I received a call from Ken and Sue, a husband-and-wife team from Tennessee who were facing a unique challenge. They needed to modify a black and white illustration of a vintage aircraft (FIGURE A) so that it could be lasered on whiskey bottles destined for a museum fundraiser.
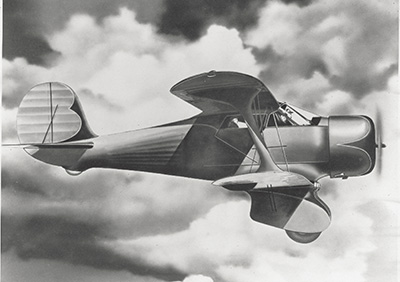
FIGURE A: This vintage illustration was supplied by Beechcraft Heritage Museum in Tullahoma, TN. Go to www.beechcraftheritagemuseum.org to learn more.
The challenge? The aircraft in the foreground of the image was in shades of gray similar to the background, making it difficult to visually separate some parts of the airplane from the background. To compound the issue, the image needed to be converted to a halftone, which further reduced the definition between the plane and the background.
I knew that the perfect tool for this was Adobe PhotoShop’s Dodge and Burn tool, but Ken and Sue were using Corel PHOTO-PAINT®. I asked them to send me the file so I could explore which tools in PHOTO-PAINT would work best for this application.
Initially, I did not get the best results with the conventional tools I usually use in this program. There are occasions, I’ll admit, when I know that Photoshop has the upper hand when it comes to a few tools—like the Dodge and Burn tool.
Or so I thought.
As often happens, however, challenging projects force me to dig a little deeper and try a little harder. Foiled by the tools I was using, I decided to see if there was a tool in PHOTO-PAINT similar to Photoshop’s Dodge and Burn tool. To my surprise there was, and it is still referred to as the Dodge and Burn tool!
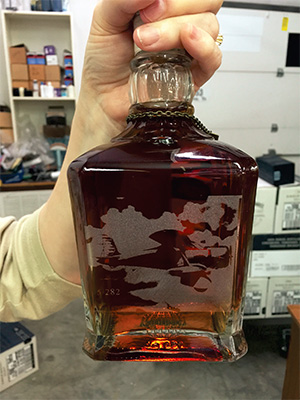
FIGURE B: Retailers Ken and Sue rendered the vintage illustration onto liquor bottles using their laser engraving system—after adjusting the graphic to create distinctions between the aircraft and clouds.
I let Ken and Sue know about this tool, and they worked independently on the image to create the final product (FIGURE B). A few days later, I revisited this tool to familiarize myself with its capabilities.
Historical Roots
In the days before digital cameras, developing film by hand took time, chemicals and skills. When I was taking my college photography classes, the word “digital” was used to describe a new Casio watch. It had nothing to do with photographic images. Today most cameras used are digital, but the art of dodging and burning is still relevant.
Dodge and burn are old-school photographers’ vernacular. Dodging and burning referred to film-development techniques used in a dark room to modify the contrast of specific areas of a photo. Typically, a photographer would first make test strips of the photograph, hovering a dark paper material over the photo paper while it was being exposed to the light through the negative. Then the photographer would move the material a few inches (about every 5 seconds) across the photo paper. This would develop darker to lighter strips across the photo because each segment was exposed to the light that developed it for different amounts of time. The longer the photo paper is exposed to the light, the darker the image would become. This would give the photographer a visual aid to determine the best overall exposure time for developing the entire photo. FIGURE C simulates what this test strip would look like.
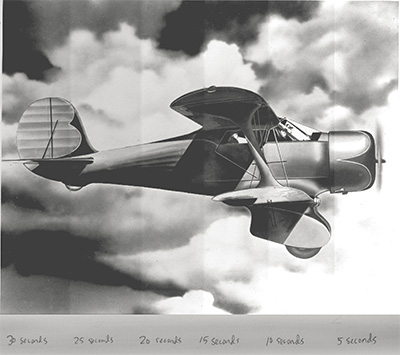
FIGURE C: This simulation of a test strip shows how a photographer developing film would test exposure times to see how long a particular frame should be exposed for maximum impact.
Even when exposed for the perfect amount of time, the photograph may still have areas of low or high contrast. Either of these issues cause a loss of detail. To isolate and fix these issues, the photographer would develop the photo again, using different materials of varying sizes with varying degrees of opacity to manipulate how much or how little light would reach a particular area or areas of the photo paper—dodging areas of the photograph or burning them.
The Process
The image that Ken and Sue were using was an illustration, not a photograph, but the techniques of dodging and burning will produce the same results. I’m using version Corel PHOTO-PAINT X7, but this tool has been part of the program since at least X3.
The first step is to change the file to grayscale if you have not already done so. Open the file in PHOTO-PAINT and select Image>Convert to Grayscale.
In this instance I’m using the Dodge and Burn on the plane, independent of the background. This means I need to use a masking tool to select just the plane and paste it onto a separate layer.

FIGURE D: Use the Freehand mask tool to select the plane so it can eventually be a separate layer
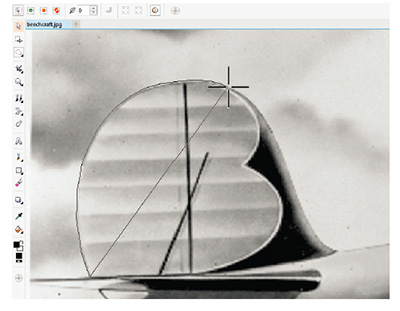
FIGURE E: Click along the edge of the plane while zoomed in to accurately capture its edges.
There are many masking options; for this image I’m using the Freehand mask (k) from the left toolbox (FIGURE D). With the Freehand tool selected, change the Feathering to zero as shown in Figure D to maintain a precise selection. For the most accurate selection, you may want to zoom in closer to the object before you start. Click along the edge of the object (FIGURE E) until you have completely encircled it. Double-click when you are back to your starting point. With the object now selected, copy and paste the object (Ctrl+C and Ctrl+V). This will place the selected object on a new layer (FIGURE F) shown with the background removed. I renamed this layer “Plane.” To view this image without the background, click the “eye” next to the background layer; click the eye again to return the background view. The same can be done on the Plane layer.

FIGURE F: With the plane visible on its own layer, you can easily lighten (dodge) and darken (burn) portions of the plane for contrast.
Now select the Effect tool from the left toolbox and choose the Custom Dodge and Burn tool from the Property bar (FIGURE G). Adjust the Nib size (I used 150) and choose a brush with a feathered edge (FIGURE H). Hard-edge brushes are difficult to control and result in hard shadow edges.
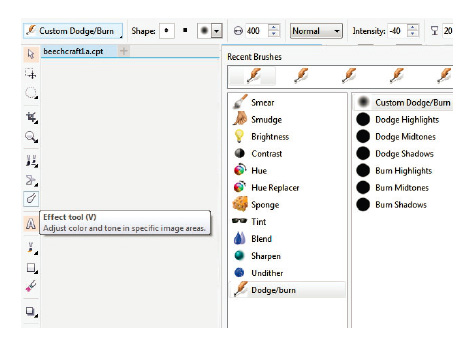
FIGURE G: The Custom Dodge and Burn tool can be found in the property bar.
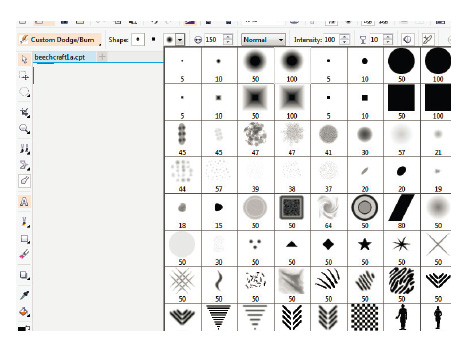
FIGURE H: For this project, I set the Nib size to 150 and choose a brush with a feathered edge.
Other Property bar settings include setting the Merge mode on Normal and Transparency at zero. The setting for Intensity depends on whether you want to dodge or burn. Setting the Intensity level into negative digits burns/darkens the image; positive numbers will dodge/lighten the image. An Intensity level of zero produces no results. You can go as far as -100 or +100 with the levels. The further from zero in either direction, the greater the change. I recommend starting at around + 20 or -20 and to build your changes slowly.
Tips for dodging and burning:
- Holding down the left mouse button and dragging continuously back and forth over the same area will not dodge or burn an area with further and further intensity, but clicking multiple times in the same spot will compound the effect with each click.
- Dodging and burning areas on the Plane layer will not affect the background layer. Likewise, changes made on the background layer will not affect the plane on the Plane layer.
For the purpose of showing the effects of the Dodge and Burn tool in this article, I’ve used this tool to an extreme measure for the plane in the foreground and an opposite measure for the background. See the original (FIGURE I) next to the extreme effect (FIGURE J) to see what drastic changes you can make with the dodge and burn tool.

FIGURE I: The original art, as submitted
I’d like to thank customers like Ken and Sue for asking challenging questions and Photoshop for giving me years of happy dodging and burning. I’d also like to thank the developers of Corel PHOTO-PAINT® for acknowledging a great tool when they see one and adding it to the users’ toolbox.
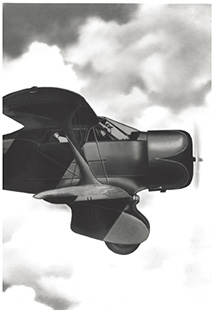
FIGURE J: A heavy hand can darken (burn) the plane while lightening (dodging) the clouds for major contrast that, frankly, doesn’t improve the photo.
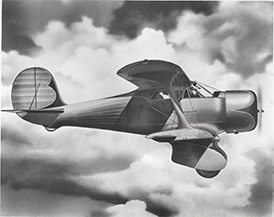
FIGURE K: Perfect! I used the dodge and burn capabilities to darken the edges of the plane and even out some of the clouds. This is an image that would lend itself to halftone conversion for lasering or sandcarving.
Watch Me Dodge and Burn!
By the time you read this, a video demo of the dodge and burn tool will be available on the JDS YouTube channel at www.youtube.com/user/JDSINDUSTRIES.
Shon Roti is a sublimation specialist at JDS Industries, Inc. He has a bachelor of arts degree from the University of Sioux Falls with an emphasis in graphic design. He can be contacted at shonr@jdsindustries.com. JDS Industries is a leading supplier in the recognition and sublimation markets. For more on JDS Industries, visit www.jdsindustries.com.