When it comes to fashion, my age and Midwestern roots keep me behind the trends. I rely on my wife’s sense of style to help keep me in current clothing—within a decade or so. It is difficult, however, not to notice the ever-increasing trend for customized accessories. Personalized items are becoming more the rule than the exception. And when the weather turns cold, there are still sublimation options for customization!
Cozy Up to Dye-Sublimated Winter Accessories
 A Graphics and Heat-Pressing Tutorial
By Shon Roti, JDS Industries, Inc.
(Originally published in the July 2015 issue of Recognition Review.)
When it comes to fashion, my age and Midwestern roots keep me behind the trends. I rely on my wife’s sense of style to help keep me in current clothing—within a decade or so. It is difficult, however, not to notice the ever-increasing trend for customized accessories. Personalized items are becoming more the rule than the exception. And when the weather turns cold, there are still sublimation options for customization!
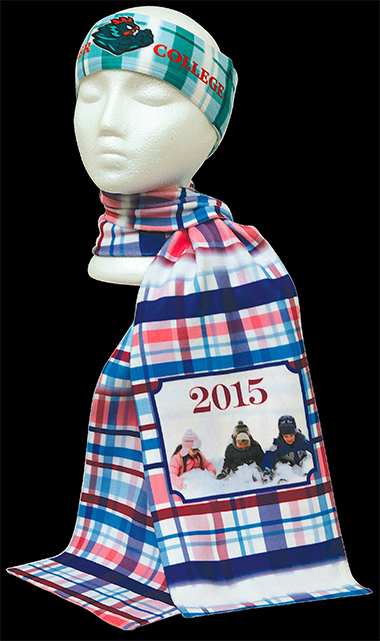
The fleece ear warmer, beanie, and scarf from Vapor Apparel™ offer a trendy way to keep your customers excited about a personalized product and help them avoid frostbite at the same time. “Accessories and sublimation are a perfect marriage,” explained Chris Bernat of Vapor Apparel™. “Accessories are by nature a color highlight to an outfit, and the color capacity of sublimation is well suited for this application.”
With dye-sublimation, the printer’s format size and heat press size generally dictate the products you will offer, with the exception of apparel. All the fleece products from Vapor Apparel™ are small-format-friendly and relatively simple to sublimate, however there will be some logistics you’ll need to be aware of before you begin producing these products. The printer and transfer size, the graphics, and the press will be the variables to consider.
Beanie and Ear Warmer
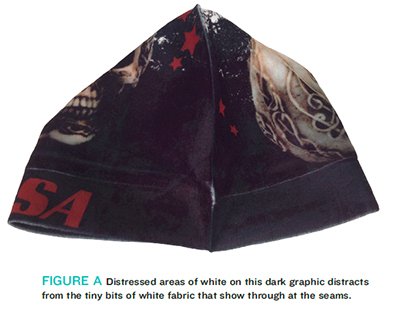
I’ll start with the beanie and the ear warmer. Like other apparel in that there are seams and stitching not part of hard substrates such as name tags, device covers, and photo panels. Do not be discouraged by this. There are ways to mitigate the challenges regarding areas of the product where direct contact between the transfer and the substrate are not perfect. In FIGURE A, notice that the seam of the beanie, though not completely covered by ink, sublimated very well given the saturation and dark nature of the artwork. Also notice that the artwork was created with intentionally added distressed areas of white that help distract from any imperfections in the sublimation process. Regardless of the substrate, sublimating a large area of a solid color onto any white substrate will always present the greatest challenge and require using best practices to avoid showing any imperfections of the process. More graphic tips will be given later in the article.
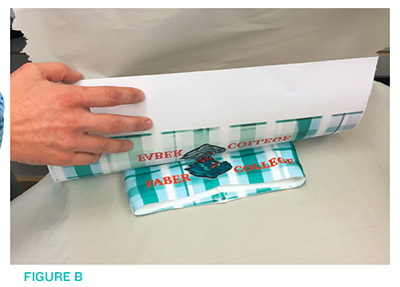
Because you will be using a flat press, these fleece items will have to be pressed twice (once on each side). The seam on the beanie and the ear warmer become the natural place to fold the item before each pressing. After you have printed the transfers for the product, spray the transfer lightly with repositionable spray adhesive (check with your distributor for this supply item), and place the substrate (beanie or ear warmer) onto the transfer. Next, layer the following items in the heat press from bottom to top: a clean Teflon® sheet or butcher paper, the substrate with the transfer on top, and another clean Teflon® sheet or butcher paper (FIGURE B). According to Vapor Apparel™, the temperature should be 380 degrees, the dwell time 35 seconds, and the pressure light. However, if you are printing the transfer from a Ricoh printer, the dwell time may be a bit longer—possibly another 10 to 15 seconds. As with all press settings for sublimation, they can also vary slightly depending on the heat press brand and model used in the process. Some compression will naturally occur with the fleece material due to the process; lighter pressure and the lower temp will help minimize the compression. Sublimating these items does not require the use of the Foamkit from Vapor Apparel™. Templates for the fleece products are typically available from your distributor or from Vapor Apparel™.
Scarf
The scarf has an extra element to consider—its length. The fleece scarf dimensions are 60 in. by 7.75 in. At first glance, you may have dismissed this product, thinking it would be limited to the capabilities of a large-format printer and a large-format heat press. Not so. Admittedly, production would be simpler with large-format printer and press, but most sublimators do not operate with that kind of equipment. Instead, you will use some creativity and a few extra pressings.
Although the heat press settings for the beanie and the ear warmer can be applied to the scarf, the dimensions of your artwork for the scarf will have to remain inside the smaller dimension of either the press size or the maximum page size of your printer. If my printer can only print a maximum 8.5-in.-by-14-in. paper size, and I have a 16-in.-by-20-in. press, my transfers would have to be smaller than 14 inches for a minimum of five transfers to cover one side of the scarf, sublimating one transfer at a time. Even with a printer with a page size capacity of 13 in. by 19 in., I can only sublimate a section close to the maximum length of my press. With a 14-in.-by-16-in. press, it would still take four pressings per side.
That brings us to the next part of the equation—the artwork. If you’ve ever tried to sublimate one long, continuous graphic using two transfers butted up against one another in one heat pressing, you know it is nearly impossible to create a seamless transition. You will, at best, end up with a very narrow white line where the two transfers were joined. If your idea is to sublimate once and then in the next pressing, overlap the first image with the second transfer, the converse happens. You end up with a narrow dark line where the overlap occurred. The best option is to graphically avoid this situation by creating “breaks” in the artwork that allow you to press the scarf in easily managed sections.
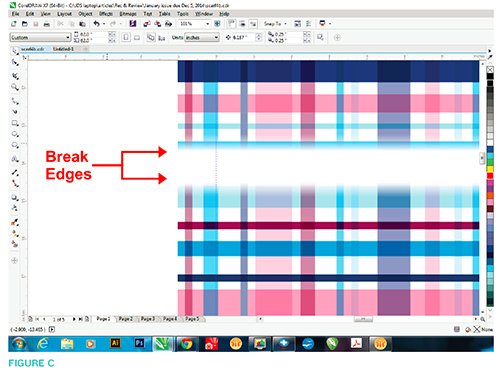
One effective and attractive way to create breaks in the artwork is to simply create a gradient in the artwork or use the Transparency tool to create a gradual fade from the edge of an image to the edge of the break (FIGURE C). Using these effects will help make the breaks look purposeful and less jarring. A way to accomplish this effect is to create a graphic with these attributes and then copy and paste the graphic on top of the artwork. This way, you can use the graphic over and over for future artwork.
Gradients and transparencies can be created using CorelDRAW, Adobe Illustrator, or Adobe Photoshop, but for this tutorial, I am using CorelDRAW X7. These tools have changed little since version 12.
Creating the Graphic Break
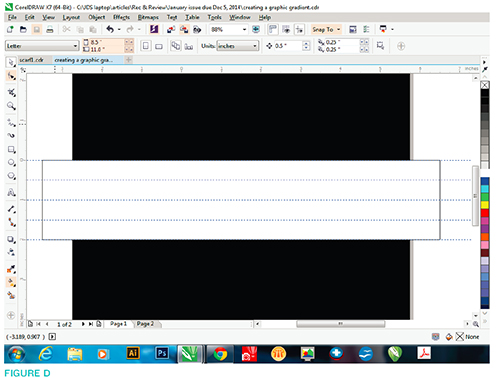
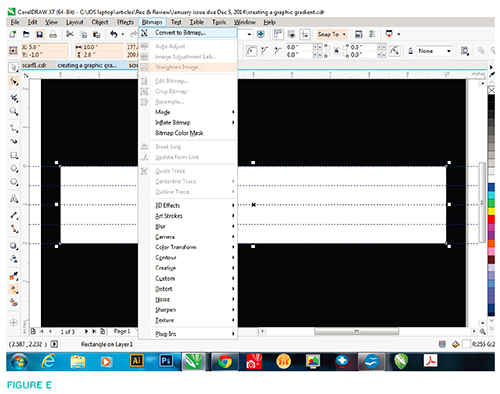
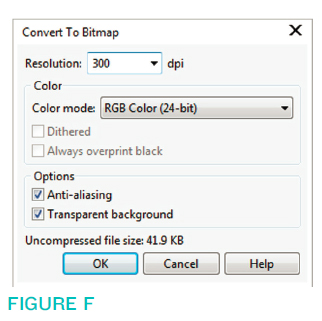
Using the Rectangle tool, create a white rectangle box that is 2 in. by 10 in. Remove the outline, if any, and place a guideline in the box every 0.5 in. I’ve added a black background to better view the white graphic (FIGURE D). With the box selected, click Bitmap>Convert to Bitmap (FIGURE E). Make sure the resolution is set for 300 dpi and transparent background option is selected (FIGURE F). Click OK.
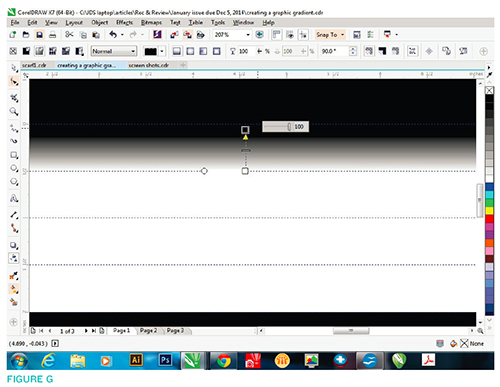
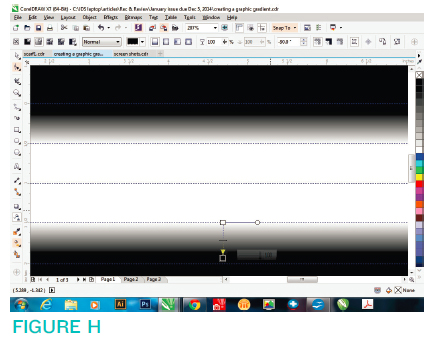
Next, use the Transparency tool (in earlier versions of CorelDRAW, you’ll find this option in the Blend tool flyout) and click on a point that is a 0.5 in. from the top; drag up to the edge of the box (FIGURE G). You cannot use the transparency tool in more than one direction, but there is a clever way around this—re-rasterize the bitmap. Select the graphic again and go to Bitmap>Convert to Bitmap. Again, you will have the option set to 300 dpi and transparent background selected. Now you can use the Transparency tool again for the bottom of the box. This time, with the Transparency tool, click on a point .05 in. from the bottom and drag down to the bottom edge (FIGURE H). You’re done! Now you can copy and paste this graphic on top of your artwork anywhere along the length of the scarf to create the breaks you need to sublimate the scarf in sections.
Using this graphic tutorial for the scarves and other fleece products will make the process of producing them much easier. My advice is to work within the products’ strengths and not to let your customer dictate a design that will frustrate production.
If you plan to do more than a small number of apparel items, a larger format printer—one that can print at least 11 in. by 17 in.— may be the better option. A larger paper size allows you to expand the borders of your artwork, otherwise known as the “bleed edge,” and makes the process of centering the product on the transfer an easier one. Adding just an extra inch of bleed edge can make a big difference in reducing the amount of spoilage in the process.
Someone wiser than me once told me to work smarter and not harder—or at least not harder than you have to. This advice, a little creativity, and best production practices will make your sublimation project much more enjoyable. Now stay warm and stay customized!
Shon Roti is a sublimation specialist at JDS Industries, Inc. He has a bachelor of the arts degree from the University of Sioux Falls with an emphasis in graphic design. He can be contacted at shonr@jdsindustries.com. JDS Industries is a leading supplier in the recognition and sublimation markets. For more on JDS Industries, visit www.jdsindustries.com.