As a CorelDRAW expert, I teach users the ins and outs of the program through websites, one-on-one training, live seminars, and more. I led seminars at January’s International Awards Market which let me interact with a lot of CorelDRAW users. One of the great things about being at a trade show is helping to solve the problems these users are having. Some of the solutions require a detailed explanation while others are quite simple.
Weld, Combine, or Trim?
Learn the Differences Between the Three CorelDRAW Functions
By Foster D. Coburn III, Corel Concepts
(Originally published in the July 2015 issue of Recognition Review.) Read more articles about CorelDRAW.
As a CorelDRAW expert, I teach users the ins and outs of the program through websites, one-on-one training, live seminars, and more. I led seminars at January’s International Awards Market which let me interact with a lot of CorelDRAW users. One of the great things about being at a trade show is helping to solve the problems these users are having. Some of the solutions require a detailed explanation while others are quite simple.
One question I tackled was asked by a woman who wanted to use text to cut a hole into the middle of a heart shape. Someone had told her the Weld command in CorelDRAW was the answer, but it wasn’t working for her.
I was able to help her and the explanation can also help you. Let’s work through this project using Weld, Combine, and Trim to see the results of each. This will help you to understand the power of these commands, which technique to use when, and the many ways you can incorporate them into your workflow.
The commands we will be discussing are found on the Property Bar in FIGURE 1. Note that these buttons will only appear if you have multiple objects selected.
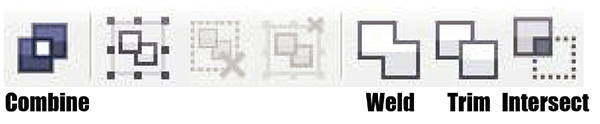
FIGURE 1: Combine, Weld, and Trim are found in the Property toolbar in recent versions of CorelDRAW—but only when you select multiple objects.
Welding the Shapes
FIGURE 2 shows the two objects involved in this operation. Even though your project may involve different shapes, understanding how each of these operations works is very important.
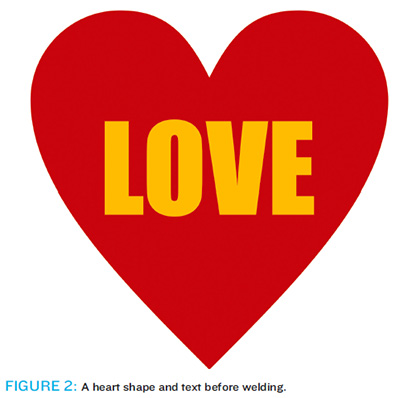
The Weld command creates a shape from the outermost line of all selected objects. With this example, the text is completely enclosed within the heart. The result of Welding the two objects is the heart shape. The original question came from someone who was told Weld was the answer, but you can clearly see that this command is not the solution for her specific situation.
Trimming the Shapes
CorelDRAW’s Trim command completes its actions based on the order in which objects are selected. You can select one or many objects as the “knife.” The very last object you select is what will get cut. For this project, you’ll select the word first and the heart last. When you trim the two objects, at first it may seem like nothing happened. This is because Trim leaves the original text in position and cuts the shape of the text from the heart. In FIGURE 3, I moved the original text down so that you could see the hole created by the Trim command.
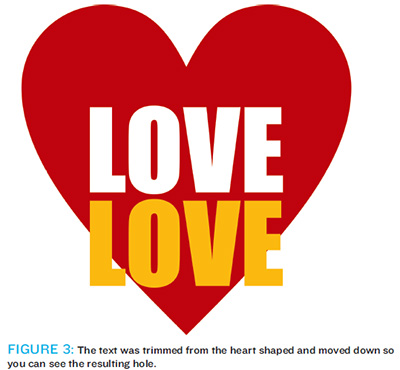
This is one way to achieve the original objective of making a hole in the heart. To complete the project, you’d delete the text after performing the Trim.
Combining the Shapes
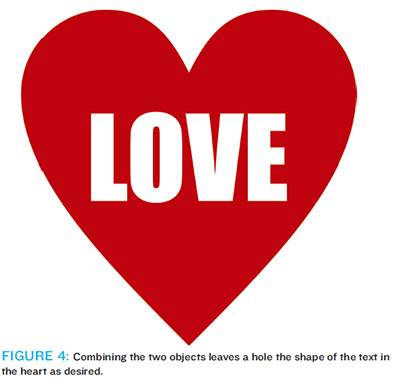
The last variation we’ll explore for this project uses the Combine command. I tend to call it the Lump command to make it easier to remember the shortcut key of Ctrl + L. It does not require selecting objects in a specific order. Just select all the objects and press the shortcut key (Ctrl + L). The results are shown in FIGURE 4.
Combine will cut a hole in the outer object where the selected objects overlap. It can also create somewhat of a reverse effect: if the text had been outside of the heart shape, the hole would exist where they overlap and the text would still be visible where it was outside of the heart. An example of this is shown in FIGURE 5.

For some projects, the reverse effect shown in Figure 5 is exactly what is needed. On this specific project, just using the Combine command on the two objects is the quickest route to getting the desired effect.
One thing to keep in mind when using Combine (or Trim as shown earlier) is that a hole is created within the heart shape. You could put another object behind the heart and the hole created would be a window to whatever is behind the heart.
More Examples of Weld
While Weld wasn’t the answer for our project, it is one of the most useful tools in CorelDRAW. Not all users are born artists and Weld allows those of us with limited drawing skills to create some complex shapes out of simple shapes such as rectangles and ellipsis.
FIGURE 6 shows the before and after of a couple of projects where the Weld command was used. The original objects include nothing but circles and rectangles that even the most artistically challenged person can easily create in CorelDRAW.
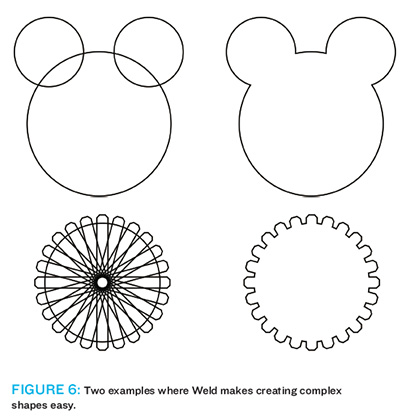
The first example is made of three circles and you can probably recognize that it looks vaguely like a popular cartoon character. If we simply filled the three objects, it could look just fine in our artwork. Unfortunately the lines overlap, which could create issues when cutting or etching. After using Weld, we’re left with a single shape with no overlapping lines.
On the bottom of Figure 6 is a shape created from a single rectangle and a single circle. The rectangle had the corners chamfered using the controls found on Property in recent version of CorelDRAW. It was then rotated 15 degrees and duplicated until there were enough rectangles to complete the circle. Lastly, a circle that was a bit smaller than the rectangles was drawn over the top.
Using Weld transforms this into a gear. Imagine trying to draw something as complex as that gear from scratch; it would be quite time consuming to get it just right. Using the method shown here, the entire gear took less than a minute to create.
When you are tasked with creating something that initially appears complex, see if there is a way to create it by using simple shapes and applying the Weld command.
In CorelDRAW X6 Unleashed, I explore each of these commands in depth so you’ll know which command to use in any given situation. If you don’t already have a copy, you may want to consider getting it to help you to understand the features described here and hundreds more.
Powerful Features
Rarely do I create a project that doesn’t include something where I’ve used Weld, Trim, Intersect, or Combine. These four features are some of the most powerful and versatile features available. (For this project, there wasn’t a solution using Intersect and therefore it wasn’t covered. Take a few minutes to explore ways that you can use Intersect in your projects to create shapes from overlapping objects.) If you are not using these four features regularly, you may want to investigate them to see if they provide a way for you to improve your workflow and decrease the amount of time it takes you to complete your projects.
Foster D. Coburn III is the author of 13 books on CorelDRAW, the latest being CorelDRAW X6 Unleashed. He writes the free Graphics Unleashed Blog (http://graphics-unleashed.com) and provides fonts, artwork and add-ons of interest to designers through the Graphics Unleashed site at www.unleash.com. Connect with Graphics Unleashed on Facebook at www.facebook.com/graphicsunleashed and follow Foster on Twitter at @fostercoburn.