Whether it’s a Rolex or a Timex, a Casio or a Cartier, a Swatch or a Shinola, watches are timeless items that people the world over gift to commemorate important life milestones. Nothing says, “I value every second with you,” more than a classic timepiece, and what better way to punctuate the moment than with a sentimental engraving on the back of the watch?

How to Engrave Watches
A Step-by-Step Guide to Diamond-Drag and Fiber-Laser Engraving
By Lori Champagne
(Originally printed in the May/June 2025 issue of Insights)
Whether it’s a Rolex or a Timex, a Casio or a Cartier, a Swatch or a Shinola, watches are timeless items that people the world over gift to commemorate important life milestones. Nothing says, “I value every second with you,” more than a classic timepiece, and what better way to punctuate the moment than with a sentimental engraving on the back of the watch?
I primarily use one of two methods for engraving watch backs. If I want a classic, old-fashioned look, there is nothing like diamond-drag engraving. This technique, which has been used for centuries, can be done on a pantograph or a mechanical engraver. It uses a bit that has a sharpened industrial diamond glued to the tip. This point, which does not spin, makes a V-groove as it drags around the metal. This produces a very shiny, thin-lined font. Thicker lines can be obtained by making multiple lines close together.
 If I want a more modern look, the fiber laser is my go-to option. This method produces a matte finish, which can be light or dark, deep or shallow, rough or smooth, all depending on the settings. Additionally, since the artwork is created digitally, any font or graphic in your computer can be easily reproduced, and complicated layouts are much simpler.
For both methods, the first steps are the same.
1. Remove the band, if necessary. Sometimes it can get in the way. If it is a metal band, you might only need to disconnect it in one location (usually at the clasp). There are watchband removal kits available online, if needed.
2. Clean the watch back. Spray isopropyl alcohol on a clean rag, then clean the watch back. Most of the time, it does not interact with the object but removes fingerprints and other dirt. You might want to do a small test first. Do not get alcohol on a leather band.
3. Find the right jig. If you did not remove the watchband, find a jig that will hold the watch without doing damage to the band. Make sure the crown, the button that sticks out on the side, is on the left side as you are looking at the back of the watch. Otherwise, your engraving will be upside down.
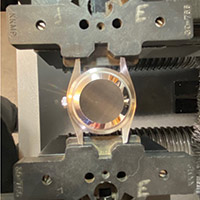
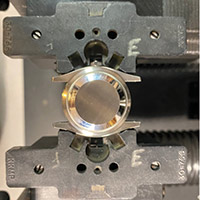
Find the right jig
4. Create your layout. Choose your fonts carefully. Try to keep your writing larger than 6 points. Smaller is still legible, but legibility decreases as age increases. My mechanical engraver has a feature that allows me to draw a circle and place my text inside of it. If yours does not, you can still draw a circle, make sure it is aligned correctly, then add your text. Block fonts, like Helvetica and Times New Roman, are much easier to read than tight script fonts, like Sweet Upright Script. Additionally, you should never engrave a script font in all caps. My favorite font is Vanessa. It is an italic script, but very legible.
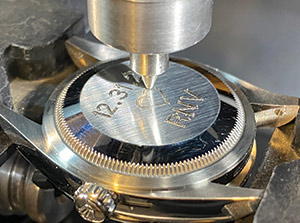
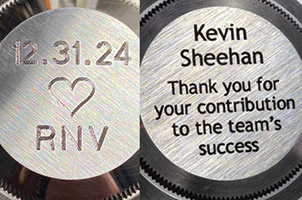
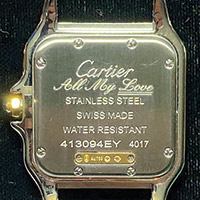
Example of diamond-drag engraving.
Diamond-Drag Engraving (After Completing the Four Steps):
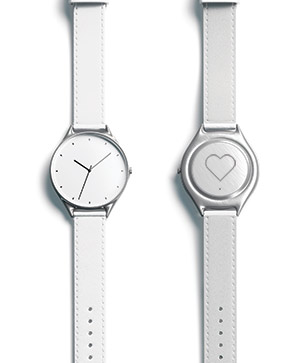
float right image of white watches with heart engraving on back
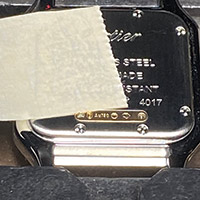
1. Align your art to the watch. Stack two pieces of standard cellophane (Scotch) tape, the kind that someone might have on their desk in an office, on top of the watch back where you are going to engrave. I run a test using the lowest pressure setting on my machine and a dull diamond-point graver. Most watches have steel backs; therefore they are not as sensitive as silver or gold, which are much softer metals, and thus will not show marks in the metal through the tape. At this point, I usually grab my magnifying glass and sometimes an extra light source, like a flashlight. If the engraving is centered, great! If not, make adjustments and replace the tape and try again. OK—you are ready to engrave!
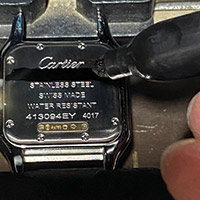
2. Make sure your gravers are sharp. If not, they can be sharpened by companies like Antares in Horsham, PA. Antares can also make custom bits if you have specific requirements.
3. Before hitting Go, proofread one more time. Is everything spelled correctly? Are there any extra spaces between words? Is everything centered? Is the punctuation correct? Occasionally, you will have to tweak the layout to be visually correct, which might look better than mathematically centered. Increase the pressure so the engraving marks with proper force.
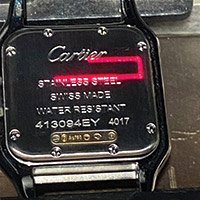
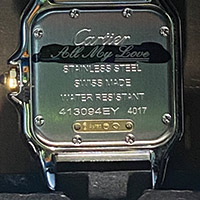
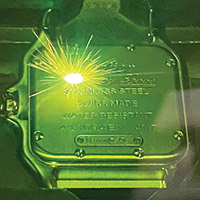
Diamond-drag engraving(left) and fiber-laser engraving (right).
4. Engrave!
Fiber-Laser Engraving
(After Completing the Four Steps Above):
1. Take a photo of the object. Make sure your lighting is good and not casting bad shadows. And be sure to photograph the piece straight on, not at an angle. You can also often find online photos of the backs of watches.
2. Import the image into your drawing program and make it the actual size. You can measure the diameter of the back of the watch or a line of text that is already engraved by the manufacturer.
3. Design your text. Be sure to correct any kerning issues. Also make sure the text isn’t too tiny. I have engraved a 3-point font on the back of a watch because the customer insisted, but I believe that legibility is more important than fitting an essay. Once the design is finished, I advise sending it to the customer for one last look.
4. Export the art and borders to your laser-engraving program. This can include rectangles to denote the location of a manufacturer’s engraving. It will help with alignment.
5. Focus the laser. If using a red-dot focusing method on a shiny surface, place a piece of masking tape where the red dot hits the watch. This will prevent inaccuracy due to reflections. If using a focusing rod, masking tape can prevent the rod from scratching your piece.
6. Align your artwork. Do not place shiny artwork directly in the center of the table. Instead, move it slightly to the side so the laser does not reflect into the lens. This can cause damage to your laser. To check the accuracy of your placement, cover the area to be engraved with a black Sharpie. Laser at a very low power, medium speed, and high frequency. For my 30-watt JPT with 300-millimeter lens, I use 1,000-millimeter-per-second speed, 8% power, and 120-kilohertz frequency. This should go through the ink but not into the watch back. Your results may vary, so be sure to run a small test. Make adjustments as needed. Proofread one more time.
7. You are ready to engrave. I suggest a base coat on the area being engraved, if the object is shiny. Even if it is not, I suggest a base coat. I use 500-millimeter-per-second speed, 40% power, and 25-kilohertz frequency. This removes the shine and makes the watch easier to engrave. Follow this up with a bright-steel setting or a dark-steel setting. Don’t go too deep into the watch back. You don’t want to overheat it, which may damage some of the components.
8. Clean any residue with isopropyl alcohol and a clean rag.
9. Create an invoice and alert the customer that their watch is engraved!
Engraving watches can also be a great source of regular income, particularly from corporate clients. Customized timepieces make memorable gifts for employee-of-the-month recognition, retirements, years of service, or team milestones. And, of course, they remain a popular and meaningful choice for more personal occasions—graduations, weddings, anniversaries, and birthdays.
With the right tools, techniques, and attention to detail, you can help your clients celebrate moments that matter—down to the very second. Because, really, any time is the right time to give the gift of time
Lori Champagne is the owner of Champagne Engraving, a
Michigan-based trophies and engraving shop specializing
in detailed jewelry engraving and B2B support for engraving
shops. A longtime member of the APA and a trusted expert in the
personalization industry, she has earned numerous honors in the
Retailer Creativity Competition and was featured on the front page
of The Wall Street Journal in 2012 for her creative excellence.