One of the key elements of graphic design is text. After all, without the text, it would be difficult to communicate an effective message. While text can provide essential information—the who, what, when, where, and why—some words need to stand out more than others, such as a headline, a person’s name, or an event, depending on the application.

By Shon Roti, Graphic Designer
(Originally printed in the May/June 2025 issue of Insights.)
There are many ways to draw attention to a word or phrase, like increasing the size, bolding or italicizing, or adding a stroke or color. But there is one effect that is a bit flashier. Because of this, some may hesitate to use it or lack a clear understanding of how it works. What effect am I referring to? The Extrude effect.
When used appropriately, this powerful effect can effectively draw much attention. It not only has versatile functionality, but it is also nondestructive, meaning the effect can be applied and the text will remain editable.
For this tutorial, CorelDRAW version 24.5.0.731 (2023) is used, although the effect has remained largely unchanged in many previous versions.
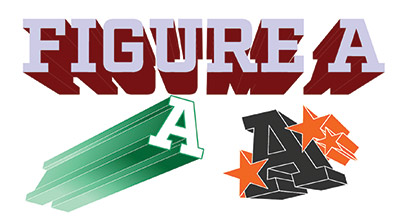
Figure A
Extrude Effect
The Extrude effect creates a three-dimensional object from a two-dimensional one by adding a projected vanishing point, as shown in the examples in figure A.
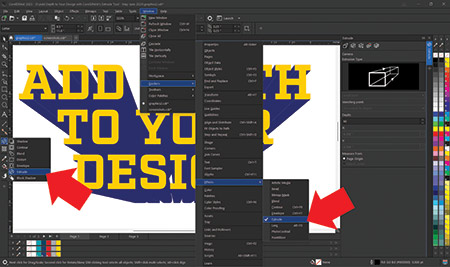
Figure B
Found in the toolbox, the effect can be accessed by clicking the arrow in the lower right corner of the icon displayed in figure B. The same effect can also be accessed and edited using the Extrude docker, which is located in the menu bar under Window > Dockers > Effects > Extrude.
To create an extrusion, type the text and then activate the Extrude tool, click anywhere on the text, and drag in any direction away from it. The vanishing point direction can be continually adjusted by selecting and moving the X, and the vanishing point depth can also be changed using the slider. These edits can be further refined by entering specific coordinates and values in the property bar, as shown in figure C.
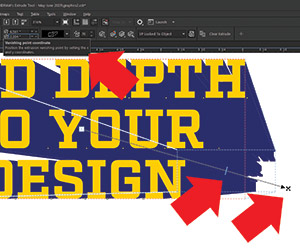 Figure C
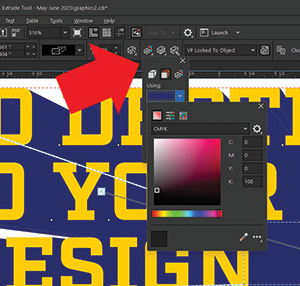 Figure D
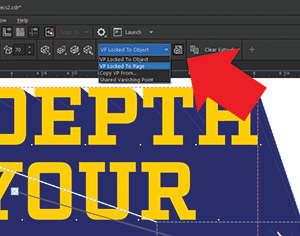 Figure E
Note: Clicking Clear Extrude in the property bar removes the extrusion and allows the user to start over.
Adding Color
By default, the extrusion will mimic the color and/or outline of the text. To edit the fill color of the extrusion, click on it, and select the Extrusion Color option. In the projection-color options, the extrusion can adopt the color of the text, have its own fill color, or display a gradient fill by selecting a starting point color and an ending point color (figure D).
All color modes are accessible here, including RGB, CMYK, PMS, and others. To modify the text color itself, simply select the text with the Pick tool and adjust using the color palettes in the workspace or the Edit Fill interface.
Six Extrusion Types
There are six extrusion types available, each offering a different perspective effect. Three of the extrusion types position the text in front of the vanishing point. These options can cause the projected vanishing point to grow smaller, larger, or remain the same size. The other three extrusion types position the text in the back with the vanishing point in front, offering the same size options for the projected vanishing point. Although I can’t think of a practical application for the other three types, they can be useful for stylized or experimental designs where reversing the depth adds a unique visual effect.
Vanishing Point Locking
By default, the vanishing point on the extrusion is locked with the text, which means that after creating the extrusion, moving the object does not change the direction or depth of the vanishing point. To keep the vanishing point fixed on the page—while still allowing the text to move and the extrusion to adjust accordingly—select the VP Locked To Page option (figure E). A toggle switch to the right makes it easy to turn this setting on or off.
Rotation
Rotation can be adjusted along three basic axes—X, Y, and Z—each controlling a different angle of movement. Rotating the extrusion can occur as long as the vanishing point remains locked to the object rather than the page. By clicking the Extrude Rotation icon in the property bar or selecting the corresponding tab in the docker, you can view a preview of a sample object. To rotate the extrusion, click and drag the preview object in the desired direction. Rotational values of the X, Y, and Z axes can be further modified in the menu below the preview (figure F).
Nondestructive Feature
As noted earlier, all of these 3D effects can be applied to the text and the text still remains editable. To edit the text after using the Extrude effect, select the Text tool and click on just the text portion of the extrusion. A new interface will open that will allow for editing of the text (figure G).
Object Extrusion
The extrusion tool is not limited to text. Vector objects can be extruded just as easily using all the aforementioned techniques. In fact, extruding an object allows for even more flexibility for modifications. For example, text can be converted into an object for further enhancement. To do this, select the text and press Ctrl+Q to change it to an object. Use the Shape tool to add nodes, create angles or curves from straight lines, and generate various tangents from those lines. The extrusion will modify itself automatically as you reshape the object (figure H). However, keep in mind that once the text has been converted to an object, it will no longer be editable as text.
Grouped objects can also be extruded together, sharing the same extrusion properties. Select all the objects and group them using Ctrl+G, then apply the same extrusion tools and properties to modify them.
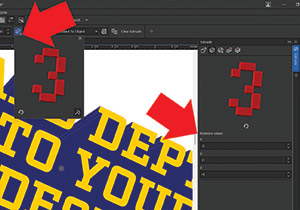 Figure F
 Figure G
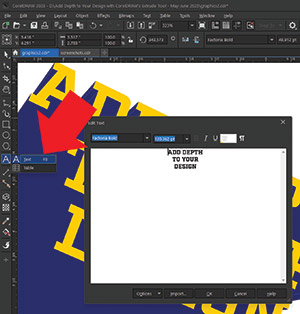 Figure H
The Extrude effect in CorelDRAW is a versatile and powerful tool that can add dimension to both text and vector objects. When used appropriately, it can easily draw attention to key elements, and its nondestructive nature allows designers to make adjustments without losing the ability to edit the original text. Once this tool has been mastered, dynamic designs can be created with greater depth and emphasis.
Shon Roti is the owner of 9th Street Designs, a graphic
design and promotional products business. Roti has
spent nearly three decades working as a graphic designer,
production artist, and instructor in the awards and
promotional products industry. In 2014, ARA named him
Speaker of the Year. Contact him at info@9thsd.com.