A bulk order of objects, each customized with unique information, can bode well for a business’s bank account. But without a quick and reliable production process, the job can quickly spiral into a tedious, error-prone, time-consuming ordeal that eats into profit.

How To Customize Objects in Bulk Using Lightburn
A Step-by-Step Guide to Customizing Drink Coasters for Wedding Place Cards
By Billie Ruben, Content and Media Specialist at LightBurn Software
(Originally printed in the March/April 2025 issue of Insights.)
A bulk order of objects, each customized with unique information, can bode well for a business’s bank account. But without a quick and reliable production process, the job can quickly spiral into a tedious, error-prone, time-consuming ordeal that eats into profit.
Thankfully, LightBurn’s Variable Text tool can help you speed through the design process and achieve easy, reliable, accurate results. No more manually copying hundreds of names and triple-checking spelling, sizing, and placement. You’ll spend more time waiting for the engraving!
For those who aren’t familiar, LightBurn is a layout, editing, and control software for laser cutters and engravers. It includes tools for creating and arranging artwork, applying cut settings, and connecting directly to your laser.
LightBurn runs on Windows and macOS, and is compatible with most Ruida, Trocen, TopWisdom, and G-code-based controllers, as well as EZCad-based galvo-fiber, CO₂, and UV lasers using either EZCAD2 or EZCAD2-LITE boards.
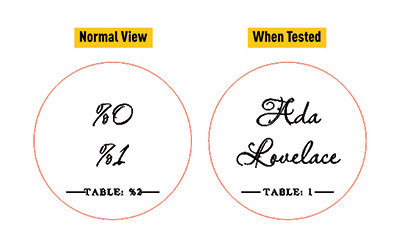
Variable Text in LightBurn works a bit like a Mail Merge. It takes information from a spreadsheet and substitutes it into your design wherever you place special codes in text. It can even shrink long text to fit. For this how-to, we will use Variable Text to insert names and table numbers onto cork drink coasters for wedding place cards.
We will also make a simple jig out of scrap cardboard so we can engrave many coasters at once, cutting down on setup and run time. The jig will allow us to easily run subsequent batches, if our items don’t all fit onto the machine’s bed at once.
2a-c and 3
4a-d
What You Need Before Starting
- LightBurn software
- A CO₂ or diode laser that is LightBurn compatible
- Blank objects (here we are using cork coasters) and appropriate engraving (Fill) settings
- A piece of scrap corrugated cardboard the size of your laser’s bed (for the jig) and appropriate cut (Line) settings
- The data you wish to put on your objects
 1
1Step-by-Step Instructions
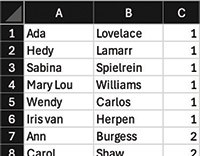
1. Save the data you wish to put on your objects as a CSV file with a different column for each field, using spreadsheet software such as Microsoft Excel, Google Sheets, or Apple Numbers. The sheet in this example is set up with first names, last names, and table numbers.
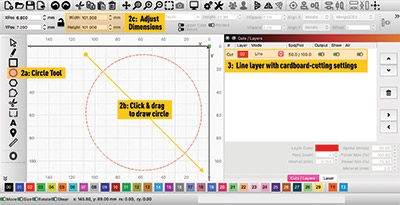
2 . Create an outline of your blank objects. Use the ellipse tool to click and drag out the shape. Then adjust the dimensions using the width and height fields.
3. Set the object to a Line layer with settings for cutting the cardboard.
4. Create your first Variable Text field:
4e-h
5
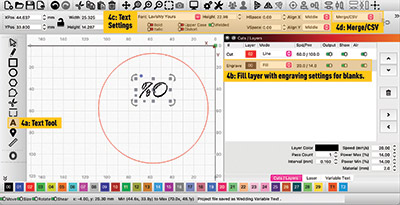
a. Use the Create Text tool to type %0. This code will later be substituted with the first column of information in your CSV file.
b. Set this text to a Fill layer with engraving settings appropriate for your blanks.
c. Change the font, size, text alignment, and placement to suit your design.
d. Change the text mode to Merge/CSV. This tells LightBurn to look for Variable Text codes.
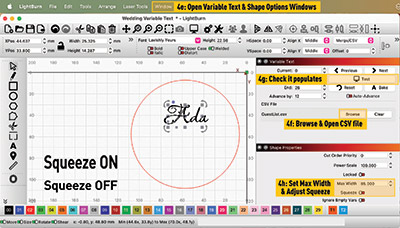
e. Open the Variable Text and Shape Properties panels from the Window menu.
f. Open the CSV file via the Variable Text panel.
g. Make sure it populates the data from the spreadsheet onto your page correctly by hitting Test.
h. Set a Max Width to shrink long names, via the Shape Properties panel (found in the Window menu). If you also turn Squeeze on, it will condense long text in only the horizontal direction. If you leave Squeeze off, it will scale the text in both directions, retaining the original aspect ratio.
5. Create the rest of your Variable Text using the process above, but changing the code to %1 for the second column, %2 for the third, etc. You can enter the code into a block of normal text—LightBurn will only substitute the code itself.
6
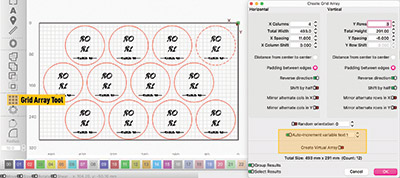
6. Use Grid Array to duplicate your completed design. Ensure Create Virtual Array is off and Auto-Increment variable text is set to 1 so each copy of the design references the next row in the sheet and shows a new person. Adjust the other settings to fit as many objects as you can on your bed, leaving several millimeters as a border for the jig between each object. Hit OK.
7
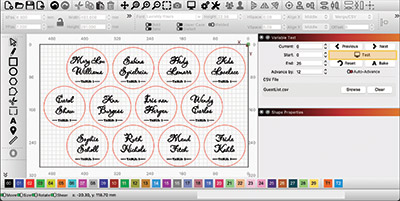
7. Test the Variable Text again to check that all the results appear as you expected. If you need to make changes, select all and go to Arrangement > Ungroup, then delete all but the original. Make any adjustments, run the array, and test it again.
8a
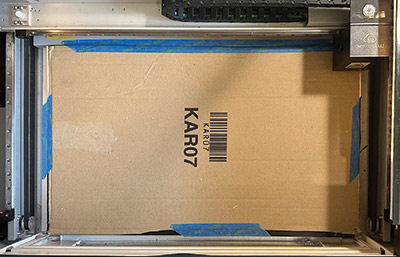
8. Make the jig:
a. Secure the cardboard in the machine so it won’t move if bumped—it must remain in exactly the same position between jobs.
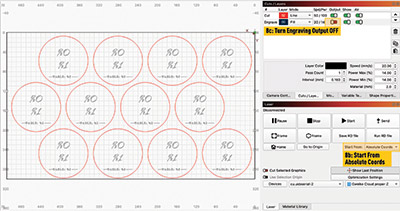
b. Use Absolute Coordinates as your Start From position—enable it via the Laser Window (if you haven’t already).
c. Cut the outlines. Turn off the output of the engraving layer so you are left with only the cut layer and then run the job as you normally would.
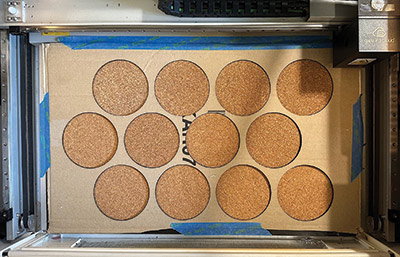
d. Finish the jig setup. Remove the circles (a piece of blue tack can help) from the finished job, leaving the holey cardboard exactly in place. Place your blank objects into the holes.
8b-c
8d
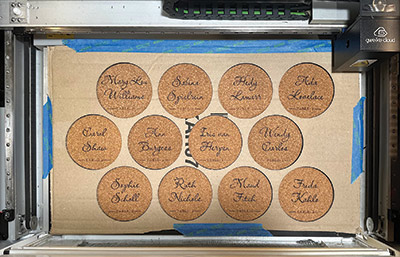
9. Run the engraving by turning the cut layer off and the engraving layer on, then previewing and running the job as normal (refocus your laser beforehand if required). The codes should be substituted with the text from the file when you preview and run the job.
9
10a-c
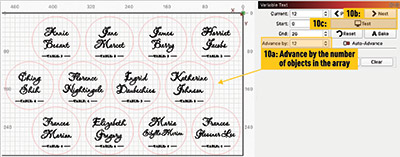
10. Run the next batch. If your items don’t fit into one job, that’s OK!
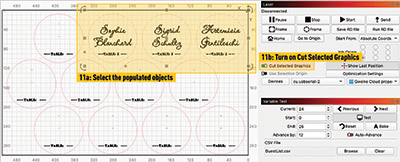
11a-b
a. Select everything and set the Advance-by number in the Variable Text panel to the number of items you were able to fit on the bed.
b. Click Next.
c. Click Test to see the next lot populate. Reset the blanks and run the job. Repeat this process to the end of the list.
11. Engrave only the objects you need in the final batch.
a. If your final batch doesn’t fill the array, select the objects that populated.
b. Turn on Cut Selected Graphics in the Laser Window. This tells the laser to ignore all objects that aren’t selected. Then you can preview and start your job as normal.
We’ve given you a brief overview of these tools and this process, but there are many ways to tailor Variable Text to your specific needs, such as using it to insert other information like the current date, a serial number, or job settings.
For more information, visit docs.lightburnsoftware.com. And, if you get stuck, you can go online to our community forum or email support@lightburnsoftware.com.
Happy burning!
