Welcome to the new world of UV printing! The past few years have brought incredible advancements in this industry, transforming what was once impossible into reality. Thanks to the integration of 2.5D and 3D technologies, UV flatbed printers now have the capability to print on items that have been off-limits for the last 15 years. This groundbreaking progress opens up a universe of creative possibilities.
How To UV Print on Irregularly Shaped Objects
By Steve Weist, CEO of PDS Equipment
(Originally printed in the July/August 2024 issue of Insights.)
Welcome to the new world of UV printing! The past few years have brought incredible advancements in this industry, transforming what was once impossible into reality. Thanks to the integration of 2.5D and 3D technologies, UV flatbed printers now have the capability to print on items that have been off-limits for the last 15 years. This groundbreaking progress opens up a universe of creative possibilities.
 Traditionally, the industry standard for printhead height—the distance from the product to the surface of the printhead—has been about 1.5mm, the thickness of two credit cards. Straying from this distance used to result in misregistration, loss of sharpness, and less vibrant images. Plus, printing on round, tapered, or warped items was a significant challenge and could lead to color variations and potential head strikes where the printhead actually crashes into the object.
But now, with the advent of long distance (LD) print mode and unidirectional printing, we can tackle these irregularly shaped objects with ease. And the market for printing on irregularly shaped items is rife with potential. With the right knowledge and equipment, you can create unique, high-margin products that stand out.
By mastering the techniques and steps that follow, you can expand your business into new markets, whether it’s personalized gifts, promotional items, or unique awards.
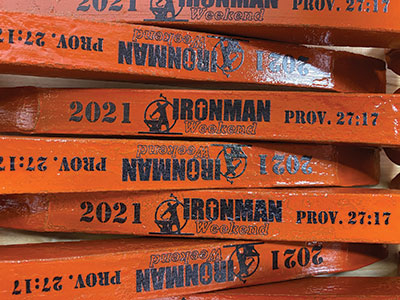
A logo and date were UV printed onto railroad spikes for a men's retreat by King Print + Design Co.
Guide to UV Printing on Irregular Objects
Place the Object in the Printer:
Position your product on the print bed or into the fixture that holds the objects you are decorating.
Upload the File to Your Computer:
Ensure the file size matches the irregular object. If printing edge-to-edge, make sure the file is slightly larger so excess ink can be caught.
Select Unidirectional Printing Mode:
Use unidirectional printing for superior accuracy and color consistency, especially on uneven products.
Choose the Appropriate LD Print Mode:
If your product is not flat or varies in thickness, select the correct LD print mode in your RIP software (LD1 for 1.5-3mm, LD2 for 3-5mm, LD3 for 5-8mm).
Verify Settings:
Ensure that the machine is set to print unidirectionally and that the printhead voltage is adjusted for the selected LD print mode.
Unidirectional vs. Bidirectional Printing
Bidirectional printing drops ink as the carriage moves left and right, requiring UV LED lamps on both sides. This method is faster but ideal only for very flat surfaces. Any thickness variation results in color shifts, loss of sharpness, and double imaging.
On the other hand, unidirectional printing, where ink droplets only happen in one direction, is the most accurate and precise way to ensure perfect dot placement and color consistency on both flat and irregular products. Because the ink droplets are fired in one direction, the chances of double imaging or misregistration are less likely.
LD Print Mode
LD print mode revolutionizes printing by allowing ink droplets to travel farther without deviating from their path. With different levels of LD print modes, printers can adjust the printhead voltage to maintain quality over varied distances. This capability lets UV-print providers achieve stunning results on previously non-printable objects.
 When to use LD Print Mode:
- When you feel your product is not flat or could vary in thickness from side to side.
- When printing on round items like tumblers or golf balls.
- When printing into a recessed area.
LD print mode allows retailers to transform ordinary items into extraordinary pieces. Karl King of King Print + Design Co. says LD print mode expanded his business.
“Long distance print mode offers great value to the operators of the equipment,” King says. “Whether the end goal is to increase the perceived value of an item, increase production and profits, or to help solve issues such as uneven surfaces, LD print mode brings so much more to the table.”
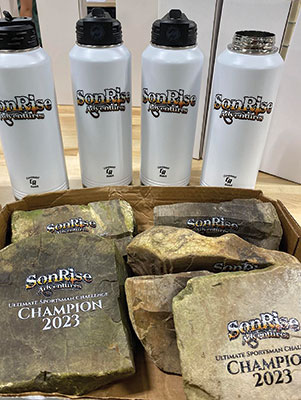
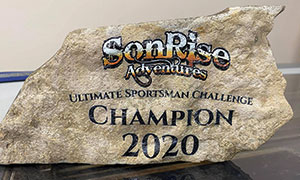
King has printed on unique items like creek rocks, creating personalized, high-value gifts and promotional items. Printing in LD mode ensures crisp, vibrant results, even on deeply creviced surfaces, giving products a hand-painted look.
Creek rocks are an item of virtually free cost of acquisition. These rocks, with their unique textures and surfaces, become one-of-a-kind personalized gifts when printed with intricate designs. The ability of LD print mode to maintain high quality even in the deepest crevices of the rock makes these items look as though they have been meticulously hand-painted.
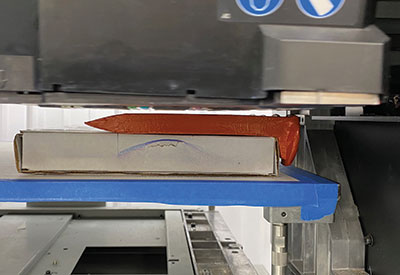
King also recently printed an event logo and date on railroad spikes for a men’s retreat. The height variation between the head and the side of the spike required LD mode to ensure the print remained crisp and clear. This unique item significantly elevated the perceived value of the gift and created a memorable memento for attendees.
Karl King of King Print + Design Co. has printed on creek rocks using LD print mode
Managing Light Reflection and Overspray
Industrial UV printheads are designed to last many years. With proper maintenance, it’s not uncommon to get five to seven years out of them, and some have lasted more than 13 years. The key to longevity lies in minimizing light reflection and overspray.
Light reflection occurs when UV light bounces back up onto the surface of the printhead and causes significant damage. It’s one of the main killers of UV printers. Try using the following tips to reduce light reflection.
- Absorb as much light as possible by using matte black, non-reflective materials for all fixtures and jigs. Try using a matte black spray paint on your fixtures. This simple $5 investment can save thousands of dollars in potential damage.
- Test your setup by running prints in a darkened room to see how much light bounces back from your materials. Even small adjustments can significantly reduce light bounce.
- Nest items as closely as possible to prevent light from bouncing between them.
Overspray is another critical issue where ink droplets miss the target and create an ink mist. This mist can float around, potentially leading to additional maintenance needs. Try using the following tips to reduce overspray.
- Ensure precise product placement.
- When printing edge-to-edge, your file should be the exact size of the material or slightly larger. If it’s larger, use something to catch the excess ink. Proper fixtures or even adhesive weather stripping from a hardware store can serve this purpose. For example, when printing on a 16- by 20-inch canvas, wrap the edges with adhesive weather stripping. Design your file to be slightly larger (e.g., 16.2 by 20.2 inches) to ensure full bleed and catch the overspray.
The advancements in UV-printing technology can empower you to deliver one-of-a-kind items that captivate clients and drive business growth. These kinds of products command higher prices, allowing you to maintain healthy margins. Clients are willing to pay a premium for items that are customized and unique, especially when they can’t find similar products elsewhere.
If you’re ready to dive into this exciting market, take the time to master these techniques. You’ll be at the forefront of UV-printing innovation, offering products that are as unique as they are profitable.
Steve Weist is a seasoned
professional with more than 32
years of dedicated service in the
printing industry. As the CEO of
PDS Equipment, he has established
himself as a trusted adviser and
industry expert. Reach him at
sweistsr@gmail.com.
