Are you confused about what size to make your images for social media posts? Join the club! I have often found myself searching for answers to this question, only to find different answers depending on the source. Facebook, LinkedIn, Instagram, X (formerly Twitter), TikTok, and others have their own dimensional preferences. And the rules and guidelines surrounding these dimensions seem to shift and change like the prairie wind.
Navigating Social Media Images
Stay Ahead of Changing Guidelines with CorelDraw’s Resizing Tools
By Shon Roti, Graphic Designer
(Originally printed in the July/August 2024 issue of Insights.)
Are you confused about what size to make your images for social media posts? Join the club! I have often found myself searching for answers to this question, only to find different answers depending on the source. Facebook, LinkedIn, Instagram, X (formerly Twitter), TikTok, and others have their own dimensional preferences. And the rules and guidelines surrounding these dimensions seem to shift and change like the prairie wind.
Keeping up with the current information can be a struggle. By the time you’ve finished reading this article, the rules may have changed yet again. But with the CorelDRAW Graphics Suite, you have tools to create graphics and resize images quickly in the dimensions you choose.
In this tutorial, I’ll share my process for creating graphics and sizing images for social media posts. But first, let me share a couple of sources I use that offer what I think is the most comprehensive and current information about size specifications.
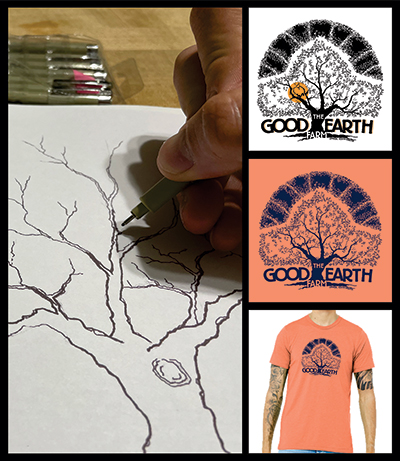
Figure A

Hootsuite, a social media management and marketing tool, shares this cheat sheet for 2024.
Sprout Social, a social media management platform, has this “always up-to-date” guide.
SocialBee, an AI-powered social media management tool, has this cheat sheet for 2024.
Facebook, the platform I work with the most, can manage several posting size configurations:
- 1200 x 630 pixels in landscape or portrait
- 1200 x 1200 for a square
- 1080 x 1920 for stories and reels
Facebook also has some arrangement options when using multiple photos in various dimensions. Figure A is one such arrangement.
Photos taken from my phone are roughly 4000 x 3000 pixels, which is larger than needed, but that allows me ample options for slicing and dicing them into whatever aspect ratio I want. Note: Aspect ratio is the proportional relationship of the width to height. For instance, a photo with 4000 x 3000 pixels has an aspect ratio of 4:3.
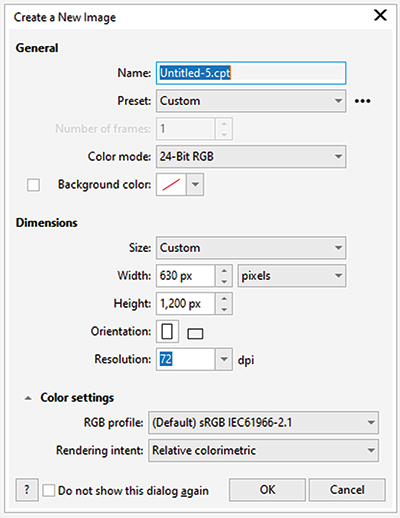 Figure B
To modify an image’s height and width, I typically use Corel Photo-Paint or Photoshop, but any photo-manipulation software can handle these options. For this tutorial, I’ll demonstrate how to create a 630 x 1200 image in Photo-Paint. I’ll be using an image from a T-shirt design project that demonstrates a bit of my process.
First, create a new document in Photo-Paint. Go to File > New (or use the shortcut Ctrl+N) and set your image dimension to 630 x 1200 (Figure B). Open the photo to be modified and select the entire image (Ctrl+A), copy the image (Ctrl+C), then go back to the new 630 x 1200 document and paste (Ctrl+V) the photo. If you have a large photo, you will only be able to view a portion of the image at this point (Figure C). Next, grab an anchor point from the corner of the image (you may have to zoom out a bit to see one). Drag an anchor point toward the center. If you hold the Shift key at the same time, this will shrink the image proportionally from all directions (Figure D). Use the Pick tool (O) to move the image around until you’re satisfied with the placement of the subject matter. Then save the file (Ctrl+S).
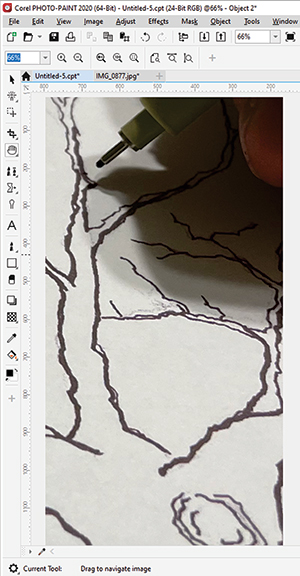
Figure C
But what if you want to create some graphics in CorelDRAW and add them to the image you want to post? How large do the graphics need to be?
To give you some idea of how to begin, go to Corel-DRAW, create a new page (Ctrl+N), and import the 630 x 1200 image you just created (Figure E). Importing this image gives me the perspective I need to create graphics that are the appropriate size and dimensions for the image.
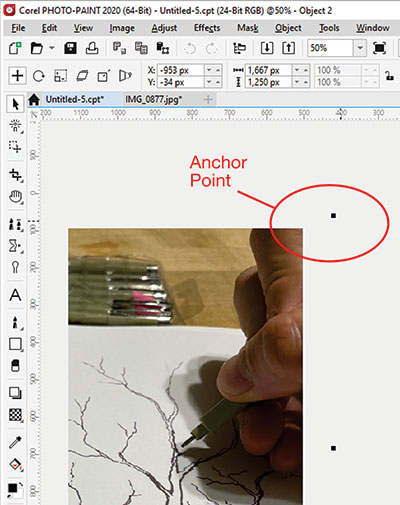
Figure D
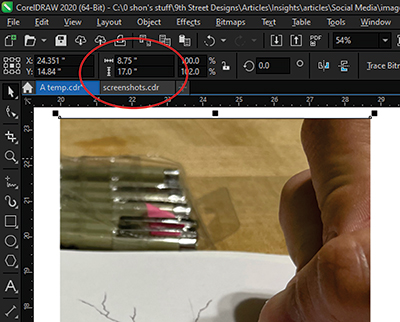
Figure E
Graphics created in CorelDRAW need to be rasterized (converted into pixels). After creating the graphics to overlay on the image, select all the objects (image and graphic) and go to Bitmap > Convert to Bitmap. Note: When you “convert to bitmap,” you are changing a vector graphic (a scalable geometric shape created with points and lines) to a rasterized image made of pixels.
Make sure the color mode is set to RGB and 72 dpi to match the size of the properties of the 630 x 1200 imported image (Figure F). Right-click on the image and select Edit Bitmap. This will open the newly created graphics in Photo-Paint. From here, you can save the image and/or copy and paste it onto the photo (Figure G).

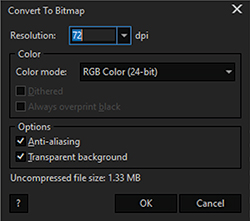
Figure F
In addition to this image, I created three more 1080 x 1080 images that will accompany it.
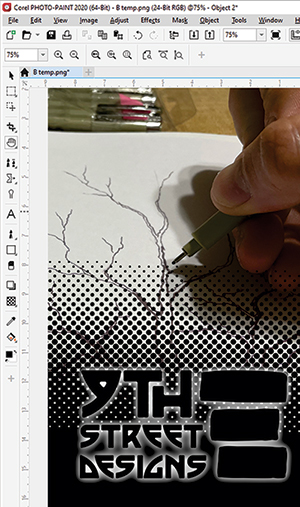
Figure G
The guidelines for posting photos and images to social media platforms can feel like shifting sands, always in flux. But with the right tools and informational resources, you’ll always be equipped to adapt to the next change—and into another dimension.
Shon Roti is the owner of 9th Street Designs, a
sublimation and graphic design consulting and
promotional products business. A graphic designer, Roti
has spent more than two decades working as a production
artist and instructor in the awards and promotional
products industry. In 2014, ARA named him Speaker of the
Year. You can find him at www.9thsd.com or contact him
at shon@sublimationconsultant.com.
