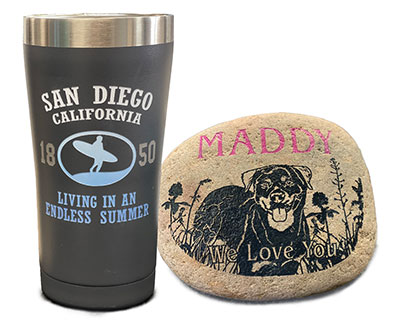
The contrasting appearance of color fill against the backdrop of a sandcarved product adds a stunning element. Products that are dark in color, such as red wine bottles, black granite, ceramics and dark glass, are prime materials that benefit from a color application—and in some cases require it. Stone and wood surfaces also require color fill.
Color Splash: Next-level Sandcarved Finishes
Tips, tricks and common mistakes to avoid when adding color fill to sandcarved pieces.
Liz Haas, sales representative, Rayzist Photomask
(Originally printed in the September/October 2023 issue of Insights.)
The contrasting appearance of color fill against the backdrop of a sandcarved product adds a stunning element. Products that are dark in color, such as red wine bottles, black granite, ceramics and dark glass, are prime materials that benefit from a color application—and in some cases require it. Stone and wood surfaces also require color fill.
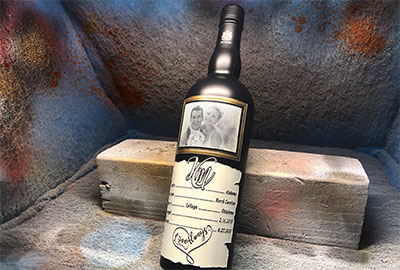
That being said, color fill isn’t required for every finished product; sandcarved pieces already have an impressive appearance without it. After all, people love to feel the depth or relief etching of sandcarved surfaces. But color fill takes that richness to the next level, and the even higher value leads to a higher sale price. When trying to move these pieces, we recommend displaying a sandcarved wine bottle with no color and one with color fill to showcase just how rich these pieces can be.
When done right, color fill can be profitable, challenging and fun. Some may find it intimidating or labor intensive, but there is also a whole group of us that finds it rewarding, too.
Painting Prep
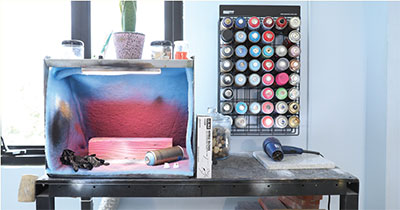
You don’t need a large area, but you should have enough room for a paint booth, stored paint and supplies. A dedicated small table is ideal, and a paint booth with an exhaust fan (vented) is highly recommended. Adding paint filters inside the paint booth will help capture the paint material in the air, protect the original look of the paint booth and provide a soft cushion for glass products. We also add a charcoal filter to the exhaust fan, which helps with fumes. Keep painting masks available, which can help reduce fume intake. Even if you have a paint booth with an exhaust fan, it is important to wear a mask, especially when painting several items at a time.

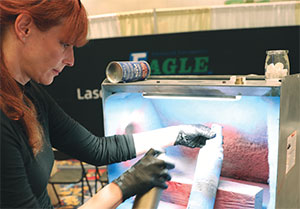
All images courtesy of Rayzist Photomask
Good lighting is also important and allows you to clearly view the painted areas on your projects while avoiding missed areas or uneven coats. We added an LED light bar atop the paint booth to provide bright light on painted items. Light also helps fix any mishaps prior to peeling the sandcarving stencil.
Painting Keys
Color filling requires quality paint and proper painting techniques. At Rayzist, we recommend mural artist paints. We’ve used these paints for the past 16 years, and they’ve proven to be durable for etched surfaces. Mural artist paints come in an amazing selection of colors and several shades, such as metallics, gold and silver.
Mural artist paints such as Montana’s black and gold series, MTN, Belton Molotow and 94 are all quality brands. Belton Molotow is known for its premium pigments, with vibrant and attractive colors. Depending on the brand, paints may have a glossy or matte finish. We have found that glossy paints require a slightly longer dry time.
Stone Tone paint is used mainly for stone, brick, granite and wood surfaces. It’s high-pressure paint and durable for outdoor wear. We highly recommend a clear coat prior to the color fill for porous stone surfaces. The clear coat will create a seal and eliminate or reduce bleeding. Paint bleeding is common on extremely porous stone surfaces.
In general, painting techniques are critical for a successful color fill. The techniques are not difficult but require patience and time; the painting process cannot be rushed. Once the product is sandcarved, use a blow gun to remove any loose abrasive material on the surface. Prior to painting, shake the spray can well, and do a test spray to ensure no spitting occurs. Spitting happens due to three common problems: poorly mixed paint, a clogged cap or a spray nozzle that is not completely engaged.
To avoid overpainting, spray in short spurts, sweeping the etched area. Paint in light coats from various angles and avoid spraying at a 90-degree angle. Spraying light coats from various angles ensures the paint is applied on the edges or sides of etched areas. Painting the edge
or the side of the etched area cannot be achieved from a 90-degree angle. Take your time painting, and examine the surface as the color fills in the etched area.
Allow the paint to fully dry, which can take 30 minutes to two hours depending on the painted surface’s size. Use your finger to test if the paint is dry. Touch outside of the design: If there is a fingerprint or a tacky surface, then the paint is still wet. Once the paint is dry, remove the stencil/mask, and clean the surface. We prefer to use plastic razors across the surface to remove the photoresist stencil. Spray glass cleaner over the surface, and then use the razor to shave off the resist. Glass cleaner or running water will provide a lubricant to prevent scratching.
There is a difference between high- and low-pressure spray paints. High-pressure paints are common and essential for painting large areas. The spray is fast and delivers a higher volume of paint in one spray. However, high-pressure paints generally result in overpainting for people who are new to paint applications. Fortunately, most items that are sandcarved and color filled are small and don’t require high-pressure paints. Less paint is disbursed per spray with low-pressure paints, giving users more control over every spray. This is key with detailed images or small items. Less is more for painting sandcarved items.
Common Fails
The No. 1 mistake for color fill is the paint lifting when the sandcarving stencil is removed. This is usually a result of overpainting and/or a lack of separation between the sandcarving stencil/mask and paint in the etched area.

Another common failure is with paint chips. We see it quite often when customers begin to paint and purchase paint from a local hardware store. This type of paint may or may not work. It is important to use paint that has been proven effective for glass, stone and other sandcarved surfaces.
Be sure to also look out for uneven coating or missing paint from detailed areas. Start with quality paint and shake the can well; faintly mixed paint can result in inconsistent colors. We cannot stress this part enough—the paint must mix properly. We recommend shaking the can for five to eight minutes to achieve that mixture.
Paint missing from detailed areas is frustrating, but patience is key. The paint material particulate may be too large to work its way into the detailed area. Each spray should target the detailed area, and the distance from the spray can to the mask should be approximately 5 to 6 inches. This distance will allow the paint to work its way into the etched areas.
If you are new to adding a color fill on sandcarved surfaces, then you must practice painting on every surface you can find—metal, glass, wood, ceramic, stone and more. Developing painting skills through practice will give you confidence. And having the right products, tools and processes will set you up for success once those orders do fill in.
Liz Haas recommends storing paint properly and keeping all paint-related supplies near the paint booth.
Three Color Fill Tips
1. Store paint properly. We keep our paint on a rack next to the paint booth. The rack stores each spray paint can on its side, which creates an easier mixture. Plus, the paint cans are organized, and it’s easy to view all the colors.

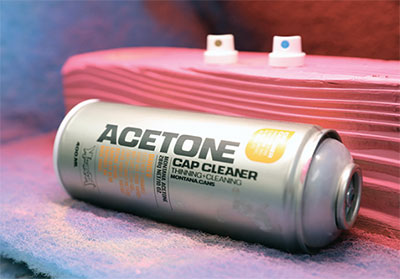
2. Keep paint-related supplies on hand and near the paint booth. We have a box of disposable gloves to protect fingernails and hands from paint overspray. Extra paint caps are crucial. Caps will clog, and having a replacement cap on hand allows you to finish the job without delay. Another important item is an acetone cap cleaner, which works like a gem. Place caps on the can and spray so the acetone cleans the cap by removing paint residue. A few other helpful supplies include plastic razors, metal razors, disposable paint cloth for cleaning and Q-tips.
3. Know your colors. What type of colors are you offering? Is it every color under the sun, primary colors or only a few? Keep it simple to start, and offer gold, silver and black, adding additional colors per client requests. Keep track of the colors to help with repeat orders.
Read more "How To" articles