Almost every project has a portion of time dedicated to the layout phase. The decision to place which design elements where may include some precision, such as centering objects, aligning text, or spacing different design elements equally. If you are relying on just your eyes for alignment, there will no doubt be a redo in your future.
Benefits of the Align and Distribute, Nudge, and Snap Tools in CorelDRAW
By Shon Roti
Almost every project has a portion of time dedicated to the layout phase. The decision to place which design elements where may include some precision, such as centering objects, aligning text, or spacing different design elements equally. If you are relying on just your eyes for alignment, there will no doubt be a redo in your future.
CorelDRAW has made alignment a snap. This article will discuss the Align and Distribute, Nudge, and Snap tool options and some handy shortcuts using CorelDRAW version 2020. No worries if you have a legacy version; these tools have changed little since their inception.
Align and Distribute Tool
I design and lay out a fair amount of business cards—a service that 9th Street Designs offers. The printing is outsourced, so it is even more important that the layout be accurate the first time. Otherwise, a redo means little or no margin left in the job and a delay of 5–7 days for the client. Figure A shows the layout for a recent business card design and layout.
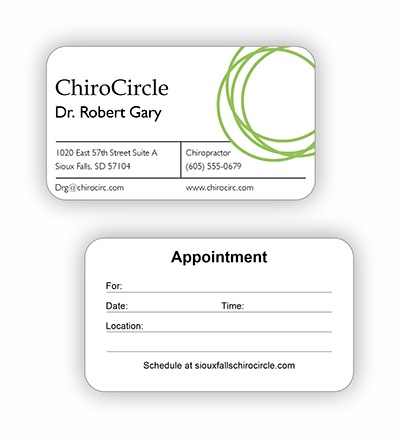
Figure A
I don’t organize these elements by “eyeballing” them into place. I use the Align and Distribute tools. Find these and other alignment options under Object>Align and Distribute (Ctrl + Shift + A) (Figure B). To reveal all the options, first select the objects needing alignment.
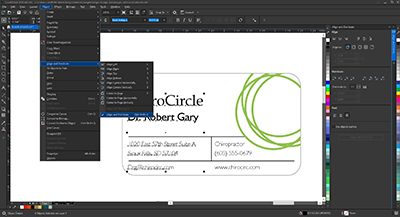
Figure B
The options for aligning objects and their shortcut keys are as follows:
- Align left edges of the objects; shortcut key, L
- Align the center of the objects horizontally; shortcut key, C
- Align the right edges of the objects; shortcut key, R
- Align the top edges of the objects; shortcut key, T
- Align object centers vertically; shortcut key, E
- Align the bottom edges of the objects; shortcut key, B
- Center an object to the center of the page; shortcut key, P
The shortcut keys make life easy. By selecting multiple lines of text, and pressing “L” on the keyboard, the lines of text will immediately align to the left, and there is no need to open any alignment tools from the top menu or use the docker. Objects that can be aligned include vector objects/graphics, text and, bitmap images.
Note: When dragging the Pick tool over multiple objects, any alignment function will default to objects aligning to the topmost object. If selecting multiple items using the Shift key (clicking one object, shift-selecting another, and so on), the last item selected will be the default object that the remaining objects will align to. Also, be aware that a bitmap may have a white background. A bitmap will be aligned from the edge of the entire bitmap, not just the areas that you can see. Selecting the bitmap will reveal the actual edges.
Distribute Tool
In a design, elements may need to be spaced equally from their centers or their edges either in the vertical or horizontal. For example, on the back of the business card, the four notation lines (shown as selected in Figure C), needed to be spaced equally from one another. The “Distribute Center Vertically” option within the Align and Distribute docker accomplishes this task. Other Distribute options can space objects evenly from their left edges, centers, right edges, top edges, bottom edges, and more.
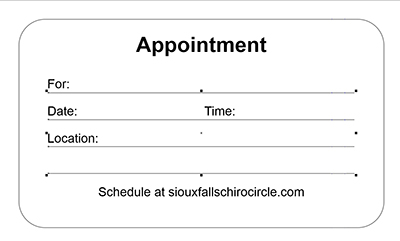
Figure C
Note: When dealing with individual lines of text or words, be aware that the ascenders and descenders of a letter will sometimes make the distribution seem uneven if some of the words have them and some do not. Remedy this by choosing the “Distribute Top” option to space words equally from their top edges.
Snap Tools
Another way to align objects is by using the Snap tools. In Figure D, the artwork is bordered by guidelines to help identify cut lines and bleed edges and to view the card’s dimensions a bit easier. The Snap tools can be found at the top of the Property bar (Figure E). Use these options to move a selected object exactly adjacent or next to either the document grid, the baseline grid, a guideline, another object, or the edge of the page. The Snap tool will feel as though there is a magnetic attraction to the object being moved and the item it is being snapped to. Any one—or all—of the snap options can be toggled on or off. The shortcut for turning all Snap options on or off is Alt+Q.
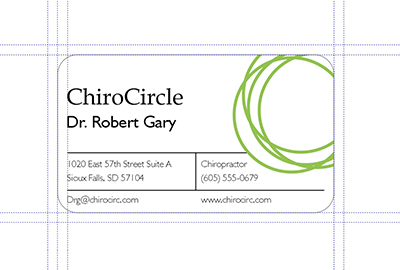
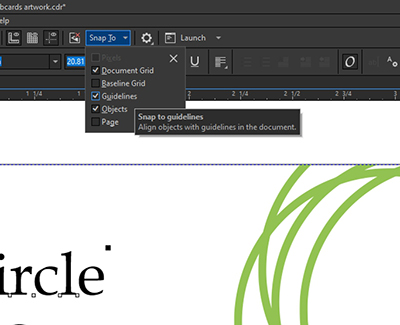
Figures D and E
Note: When maneuvering objects with the Pick tool to snap objects into place, holding the Ctrl key while doing so will ensure that the object does not move randomly up or down before it reaches its destination. Holding the Ctrl key while moving an object will allow the object to stay perfectly in either a vertical or horizontal plane as needed.
Nudge Tool
I cannot put into words, exactly, how much I appreciate the Nudge tool. If you are not using the Nudge tool during the design or layout phase of a project, you should start using it immediately. The Nudge tool can be found at the top of the Property bar when no objects are selected (Figure F). Setting the nudge distance to a particular number of inches, allows objects to be moved out of the way in a known distance using the arrow keys on the keyboard (Figure G), ensuring that things can be put back together just the way they were without having to “undo” any steps.
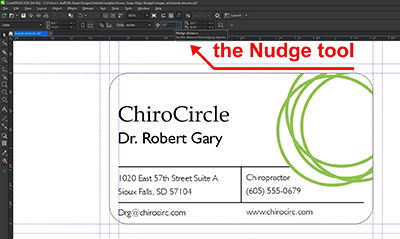

Figures F and G
For instance, while I was working with some design features of the logo in the business card (the green overlapping circles), I was manipulating this design element by making it bigger or moving it to different areas around the 2-in. x 3.5-inch space. For every resize and move I performed, I copied and pasted that object where it lay (Ctrl+C, Ctrl+V) and nudged the copied object away from the area to try other design options. That way, I could keep multiple design elements nearby and decide later to nudge my preferred design element back into place exactly where I originally created it. See Figure H for the multiple design elements encircled around the business card dimensions. The Nudge tool can also be used to copy and paste multiple design elements (equally spaced apart) or moved to a predictable distance within the design area.
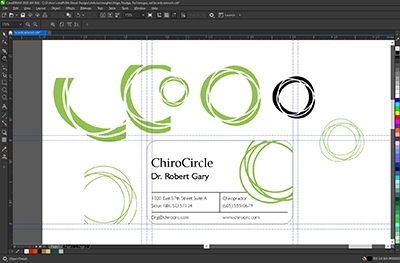
Figure H
Using these layout tools is a must for any designer or production specialist to ensure elements are place exactly where the designer wants them to be. These tools most certainly align with best practices for any retail shop.
Shon Roti is the owner of 9th Street Designs, a sublimation & graphic design consulting & promotional products business. A graphic designer, Shon has spent more than two decades working as a production artist and instructor in the awards and promotional products industry. In 2014, ARA named him Speaker of the Year. You can find him at www.9thsd.com or contact him at shon@sublimationconsultant.com.