Before I opened Champagne Engraving in Michigan, I operated a shop in Carlsbad, CA, that was famous for being able to engrave anything, from apple pies to zippers. Jigs were key to us gaining that reputation. Trial and error led to experience, allowing us to create jigs to personalize odd-shaped items.
How do you create jigs that keep your product where it belongs without crushing it? It depends on whether you're using a laser or a mechanical engraver. Let's start with the laser.
Getting Creative with Jigs
The art of holding items for laser engraving and more
BY Lori Champagne, CHAMPAGNE ENGRAVING, Waterford, MI
Before I opened Champagne Engraving in Michigan, I operated a shop in Carlsbad, CA, that was famous for being able to engrave anything, from apple pies to zippers. Jigs were key to us gaining that reputation. Trial and error led to experience, allowing us to create jigs to personalize odd-shaped items.
How do you create jigs that keep your product where it belongs without crushing it? It depends on whether you're using a laser or a mechanical engraver. Let's start with the laser.
LASER JIG MATERIALS
Paper
You can use paper as a jig with your vacuum table. Some people believe their vacuum table doesn't hold items down. In order to work properly, all holes or grid sections must be covered. You can see in IMAGE A I've used paper and cut out an area for a 3.5-in.-by-6-in. plate, and I will use extra paper to cover the rest of the vacuum table. I guarantee you that table will suck things down and generally keep plastics from warping. I get my paper from a local print shop that lets me take their discards. It's 11 in. by 17 in.

IMAGE A
Cardboard, Matboard, and Foam Board
I cut a lot of holes in cardboard to make individual jigs, especially when engraving watches or pocketknives. When engraving small baby charms, I photograph the piece and trace the shape in CorelDRAW, then use the laser to cut it out of matboard. That way, I know exactly where the charm is and exactly where my text is going. When engraving large quantities of similar items, I cut thumb and finger tabs so I can easily transfer items in and out.
Foamcore®, foam board, and Corafoam® are also good materials for making jigs. Always check the specifications of your material before lasering, though most modern foam boards do not contain PVC. Remember to cut it at a low DPI and low power to avoid melting the foam too much.
IMAGE B shows a cross and the jig I made to hold it. The back of the cross where I was engraving was flat, but the front had an additional pewter piece depicting a little girl praying that kept it from sitting flat on the table. What to do? First, I laid down a piece of cardboard and cut an oval for the pewter to sit in. I then taped a second piece of cardboard on top and cut out not only the oval but also the shape of the cross. That let the cross sit flat so I could use my fiber laser on the back.
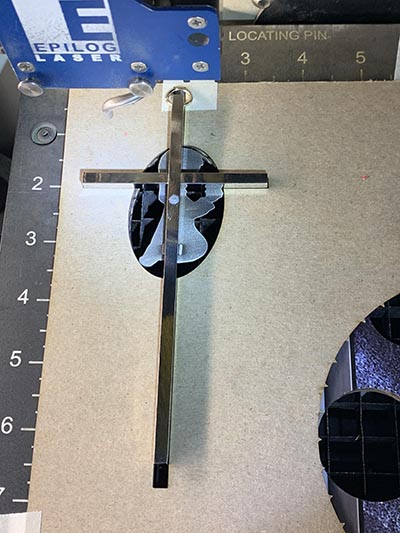
IMAGE B
Floam® or Kinetic Sand™
Floam and Kinetic Sand are sold for kids but can work well to hold items in place for lasering. Floam is made of polystyrene beads in a moldable foam/slime substance that can be shaped. Kinetic Sand and Royal Play Sand™ are two of many brands of hydrophobic sand, which forms like wet sand but isn't wet.
Purchased at the Dollar Store, I use this sand to hold irregularly shaped items like a ridged decanter cork and even a zucchini! Just form the substance into a container, and push the object you want to engrave into the sand. I've even used it to engrave the inside of a ring, as seen in IMAGE C. Be aware the sand does tend to move around a bit, but if you are careful, it should hold up.
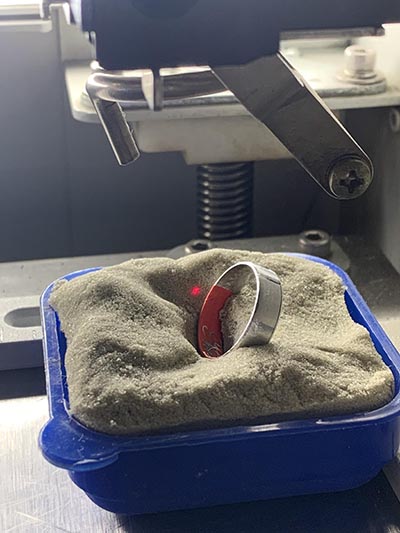
IMAGE C
LEGO®
Believe it or not, LEGO bricks and similar generic blocks make marvelous jigs. As you can see in IMAGE D, I used them to hold a sword. The LEGO bricks lifted the grip and guard off the table, while keeping the blade level. The advantage to using LEGO bricks is that I can do a test engraving on masking tape, then easily remove the sword from the laser, inspect the results, and put it back in the exact same spot.
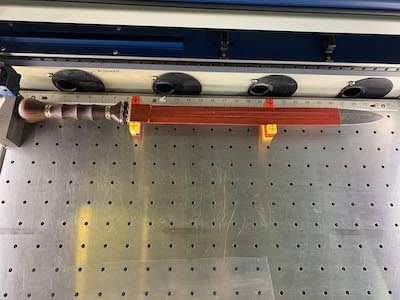
IMAGE D
LASER ROTARY ACCESSORIES
There are two main kinds of rotary accessories for lasers: ones with wheels (rim-drive), which is what I have for my Epilog Laser, and compression/chuck style.
Occasionally you get a glass like the one in IMAGE E that won't hold well with the clamp, or the glass is too light to properly rotate. Perhaps the diameter is too small or has an odd lip. I keep a roll of quarters underneath my laser just for such an occasion. Putting the roll in the glass gives it enough weight to hold it down, and still allows it to roll with the rotary wheel. It has been a lifesaver.
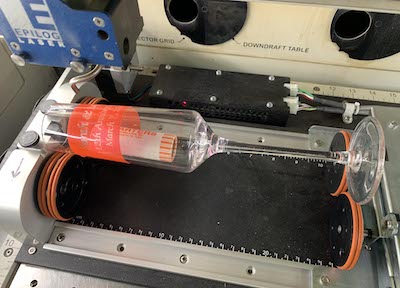
IMAGE E
Your rotary attachment doesn't always have to rotate. I engrave clarinets for one of my clients. They can't roll because of all the mechanisms on them, but I use the unplugged rotary attachment and a 5-pound sandbag from a scuba supply store to hold it in place.
When engraving mugs with handles, I strongly recommend using the red dot or laser pointer feature to trace the outer edges of the image. You don't want to start engraving and have the handle run into your wheels or laser head. I level my mugs by using a tiny level right on the handle.
MECHANICAL ENGRAVING JIGS
Editor's note: Automated engraving systems were developed after pantographs and before laser engravers. They are known by many terms, including computerized engraving, and by terms that refer to how the tip moves during engraving (e.g., rotary engraving and diamond-drag engraving). To avoid confusion in this article, we'll refer to it as "mechanical engraving."
I have a Dahlgren Wizzard and a recently acquired Signature mechanical engraver.
When you get any new machine, even before you take it out of the box, READ THE MANUAL! You'll be lucky if you understand and retain half of it. A few months after you start using the machine, read the manual again. You will retain more information once you have played with the machine for a while, and you will gain a deeper understanding of how the machine works. Read the manual at least twice during the course of the first year.
When I reread the manual for my Signature engraver, I "rediscovered" that my engraving head can tilt, as in IMAGE F. This was fantastic news, and I saved considerable time in the future by not having to build elaborate jigs.
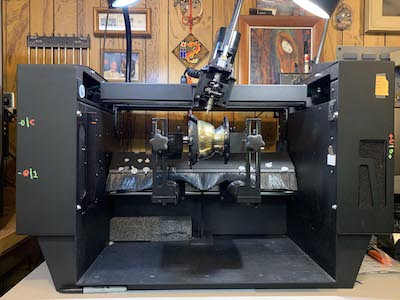
IMAGE F
Acquired Jigs
Most small jigs in our industry have a 2.25-in. span between the two pegs. This means that you can use jigs from other companies on your machine. When the International Awards & Personalization Expo returns to Las Vegas next year, visit the booths of companies whose machines you do NOT have. Look at their jigs. They might be compatible with your machine, too, and might solve a holding problem that you have.
Signature Engraving and Quality One Engravers (Q1E) both make jigs I love. Quality One's peg jig shown in IMAGE G is my favorite right now. It uses 1/8-in. diameter pegs, which happens to be the same 1/8-in. diameter diamond point gravers that wear out over time. I use little rubber caps on top of them and I can squeeze almost as hard as I want on jewelry without crushing or denting the piece. Signature also has a great jig with tiny tabs to hold jewelry so I can engrave edge-to-edge. This is my go-to jig for tiny hearts and bar necklaces. IMAGE H shows some of my other jigs I have around the shop. I mounted them on a board with nails to keep them organized.
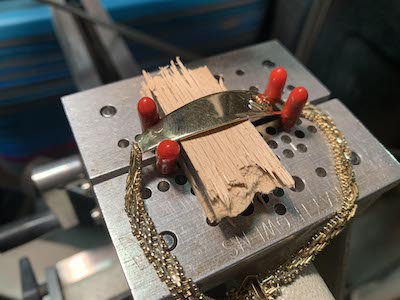
IMAGE G
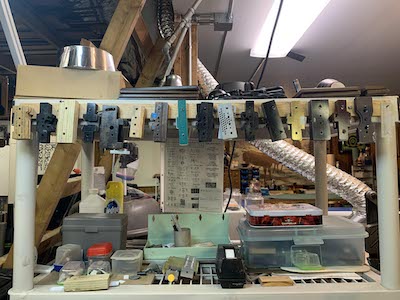
IMAGE H
Seklema®
I really like Rowmark's Seklema, a double-sided tacky mat. Nothing moves or jiggles. I have mine set up on a 12-in.-by-12-in. worktable for my Wizzard, which I can also put on my pantograph. Additionally, I have a scrap piece for when I need to incorporate it on a smaller jig. Sometimes I brace a piece in by putting additional metal plates around the item being engraved.
Thermo-Loc®
I discovered Thermo-Loc through jewelers I work with. It's a reusable polymer that is shapable when it's warmed but solid at room temperature. It's like hot glue, but less permanent. I heat up water in a little teapot and pour it into a tumbler and add a piece of Thermo-Loc. It will soften within about 30 seconds. I usually press it onto my peg jig, and then I just push in the item I'm engraving, and the Thermo-Loc will hold it. Once the engraving is complete, it can be thrown into hot water—or hit it with a heat gun, and the engraved item comes right out. A small amount is affordable, reusable, and will last a long time.
Manage the Photos and Engraving Placement, Too
Lori Champagne based this article on a portion of her Awards and Personalization Association webinar "Let's Get Jiggy—Using Jigs to Hold Odd Pieces in Your Engravers." In the beginning of that webinar, she covered how to get good photographs of the items you engrave and how to plan placement of the engraving on the item using the photo in CorelDRAW. Awards and Personalization Association members can go to AwardsPersonalization.org/Education/Webinars/WebinarsLibrary/LaserEngravingWebinars to watch the webinar for free.
REAL-LIFE DIY JIGS
Here are a couple jigs I came up with to engrave odd-shaped products or interesting engraving placements.
Bullets: I had someone bring in about a dozen bullet casings, and they wanted five lines on each, evenly spaced, 72 degrees from one another around the bullet. At first, I said, "There's no way I can get this evenly spaced," but then figured all I needed to do was cut wood into little pentagons with circles in them sized to the circumference of the bullets, as shown in IMAGE I. The pentagon was necessary to evenly space five lines of text. I could have used a square for four lines or a hexagon for six.
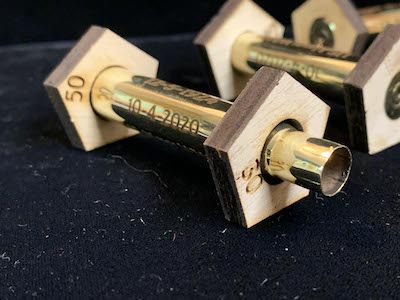
IMAGE I
The pentagons with 30 engraved on them have holes that are .3 in. in diameter to fit over the circumference of the bullet points, and the ones with 50 engraved on them have .5-in. sized holes to accommodate the caps. I made 24 of these 1-inch pentagons, enough for a dozen bullets. I put them on all the bullets and then used magnets and a steel block to hold the jig in place. I engraved every first line, rotated them, engraved the second line, etc. I was able to take them in and out and everything stayed accurate, with the lines of engraved text 72 degrees apart.
Chair back: I had a customer bring in a chair that had the planks making up the back cut into the shape of Michigan. They wanted the Marine Corps logo engraved across the planks. Unfortunately,
I couldn't take the planks apart without breaking the chair. However, the arms and front legs would come off, so I did that and balanced it in my laser, as in IMAGE J. I had one leg balanced on cans of spackle, and the other balanced on a step stool and an old crystal award. You can always find a way.
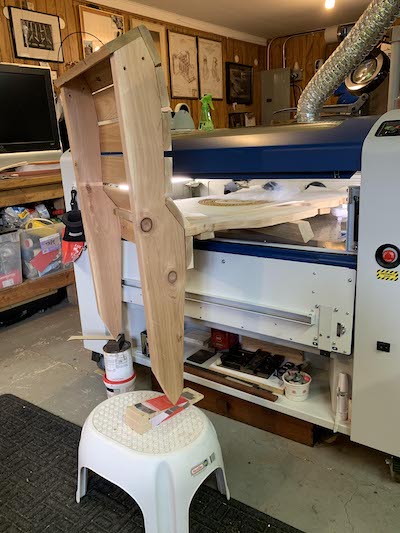
IMAGE J
FINDING THE RIGHT SPOT
Once you've set up your jig, you still need to ensure that the engraving will hit the correct location. On the laser, I like to use the red dot or laser pointer. If your laser has this feature, you can create an outline around your artwork in CorelDRAW, print it in vector format to the laser, and trace the location with the red beam. Sometimes I will print the artwork on paper, tape it to the item to be engraved and run the red beam to ensure it follows the path I expect.
Know your machine. My laser has various print modes. The ones I like most are center-center engraving and left-center engraving. I use the center-center engraving when I laser mugs. If I get an order where the customer wants each mug to be engraved with a name that's centered below a previously imprinted logo, I use the center-center feature to ensure that the name is centered below the logo, regardless of the name's length.
If you need further testing, you can use masking tape, release paper, or laser tape. Run the job at a low DPI on your laser. I'll pull my DPI down to 150 and I will generally engrave at 45 speed and 13 power. If I'm engraving on something that the CO2 will react to, I'll pull the power even lower to 8 percent.
I use Scotch™ tape or cellophane tape when I engrave on a mechanical engraver. I can see the placement of the engraving, and unless it's a brand-new diamond tip, it's not going to engrave into the piece if I use light pressure. I can get the engraving centered exactly as I need it. If something doesn't look right, I make adjustments and run another test.
Remember: Tape is cheap; replacing someone's 24-karat gold charm is not. Aluminum foil tape (not duct tape) is also an option. It's like aluminum foil with an adhesive back. It's not so sticky that you can't peel it off, but it's got enough body that you can mechanically engrave it and not have the engraving go through to the piece.
Think outside the box and beyond the commercially available jigs, whether you're using a laser system or mechanical engraver. What oddball materials could you use to hold a piece in place for engraving? How can you make a large item more manageable—and balance it—to get it into your engraver? I've been thinking like this for years, and now I'm challenging you to try it, too.
Lori Champagne has had many careers, from picture framer to Muppet builder, from hotel night auditor to newspaper editor. In 1994 she found the awards industry. In 2012, Champagne sold her California-based retail shop and moved to Michigan. Champagne still does some retail work, but today she predominantly operates in a business-to-business setting, assisting other engraving shops.