Have you ever stopped to think how certain tasks were completed without the use of the tools and technology that exist today? I can still recall—as a production artist in 1998—receiving artwork via mail. This had as much to do with the size constraints of email attachments at the time, as with the clients’ familiarity with email technology. This mailed artwork would often arrive as a tri-folded piece of paper in an envelope—a piece of paper that probably had two creases running through what the client was calling “artwork.” My job was to digitize the artwork using a “state-of-the-art” HP flatbed scanner (a process that often took 20 to 30 minutes) and make it production-ready for whatever process was required for the product requested.
The Trace Tool: A CorelDraw tutorial
By Shon Roti, Sublimation Consultant, Graphic Designer
Have you ever stopped to think how certain tasks were completed without the use of the tools and technology that exist today? I can still recall—as a production artist in 1998—receiving artwork via mail. This had as much to do with the size constraints of email attachments at the time, as with the clients’ familiarity with email technology. This mailed artwork would often arrive as a tri-folded piece of paper in an envelope—a piece of paper that probably had two creases running through what the client was calling “artwork.” My job was to digitize the artwork using a “state-of-the-art” HP flatbed scanner (a process that often took 20 to 30 minutes) and make it production-ready for whatever process was required for the product requested.
In the late ’90s, I was just beginning my relationship with CorelDRAW. I cannot tell you when it was that I discovered the Trace tool. Twenty-three years ago, I certainly did not know the importance and impact this tool would have for me. But since that time, it has played a significant role in my graphic design career. I still consider this tool one of the most useful tools Corel offers.
Since its addition to CorelDRAW in 1992, the Trace tool has improved significantly and the options within it are now many. In this tutorial, I will compare these options as they exist in their current form in version 2020.
For those unfamiliar with the Trace tool, this tool transforms a raster image or photo (bitmap, JPEG, PNG, etc.) into a vector/mechanical drawing. For example, FIGURE A is a scanned pen and ink drawing I created for what would become a T-shirt design for a local running club (FIGURE B).

Figure A

Figure B
Because I was able to vectorize my original drawing, this allowed me to make several quick design changes (FIGURE C) using other vector tools until I was satisfied with the results. This would have taken more time if I had to redraw the artwork repeatedly to get to my final design. Because this drawing was a simple pen and ink, the Quick Trace tool was sufficient and as promised, rendered the image quickly. For most black-and-white images and relatively uncomplex logos, this tool works great, although there is no PowerTrace dialogue box to open that can control results.
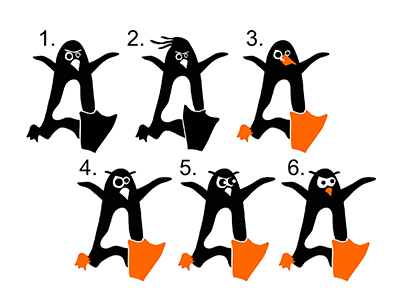
Figure C
The final file could then be readied for use in many processes, depending on the client’s needs, including screen printing, lasering, sublimation, or embroidery, to name a few.
Trace Tool Options
For the Trace tool options to appear in the property bar, an image must be selected in the workspace. The Trace options can be found under the Bitmap menu as well (Figure D).
There are two basic Trace tools: Centerline Trace and the Outline Trace.

Figure D
Centerline Trace
The Centerline Trace has two subsets: Technical Illustration and Line Drawing. Both are useful when rendering schematics, maps, or technical drawings into a collection of lines. This tool renders a black-and-white image to lines or strokes. It does not, however, handle colors well and does not render to a fill. FIGURE E shows a bitmap of a technical drawing and the rendered result using the Line Drawing option. The Technical Illustration produces thinner lines and does not have a dialogue box. The Line Drawing option produces thicker lines and offers a dialogue box to interface with for more control over the results (FIGURE F).
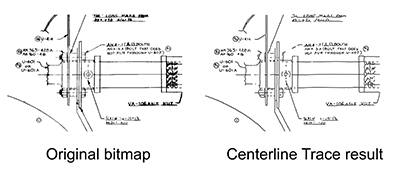
Figure E
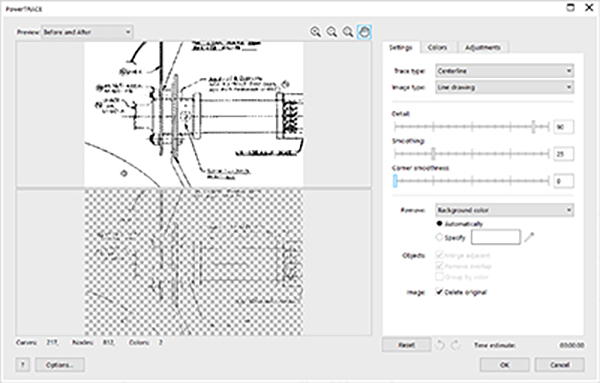
Figure F
Outline Trace
The Outline Trace options are probably going to be more useful for the user working with colored logos and artwork, as it produces only fills (no outlines) and handles multicolored images well.
The Outline Trace can be found in the same location as the Centerline Trace and has numerous subsets, including Line Art, Logo, Detailed Logo, Clipart, Low-Quality Image and High-Quality Image (Figure G).
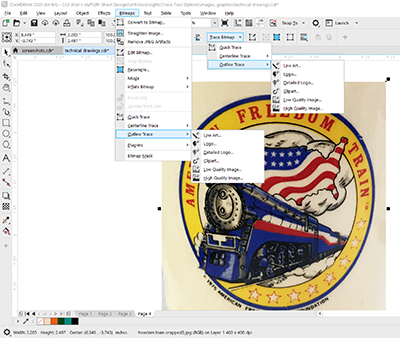
Figure G
Although these options do produce similar results and offer a dialogue box (PowerTrace) for further adjustments, here is a quick reference guide for when to use each:
- Line Art: great for rendering black and white images or drawings.
- Logo: useful for simple colored drawing and logos with little detail. This option renders quickly but will render less detail (which may or may not be useful).
- Detailed Logo: does an excellent job rendering complicated, highly detailed logos and images with many colors. This option can take a while depending on the level of detail selected and the computer’s processing power.
- Clipart: renders simple images with distinct color differences and edges. This is a fast but low-detail rendering. This will offer slightly more detail than the Logo option in most cases.
- Low-Quality Image: used with images that have a low resolution/quality or images that have highly detailed areas that need to be ignored.
- High-Quality Image: works well tracing high-resolution/quality images. This option can take a while depending on the level of detail selected and the computer’s processing power.
The results for rendering time, number of colors produced, and objects created are detailed in FIGURE H.
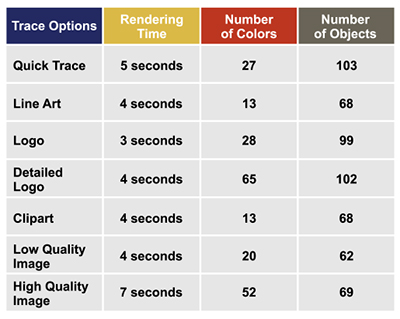
Figure H
If you are like me and understand information better when offered visually, I have experimented with each PowerTrace option using the same image and the same detail settings in the dialogue boxes.
The information below gives details about the image, my computer, and the specific settings used in the PowerTrace dialogue box.
- Image: full color JPEG (RGB), 2.2x2.5 inches at 400 dpi
- My computer: 64 bit, Intel Core, i7-6500U CPU @ 2.50 GHz, 16 GB of RAM
- PowerTrace Settings: Detail—50, Smoothing—25, Corners—0, Colors—256 (FIGURE I). AI settings turned off, no JPEG artifacts removed.
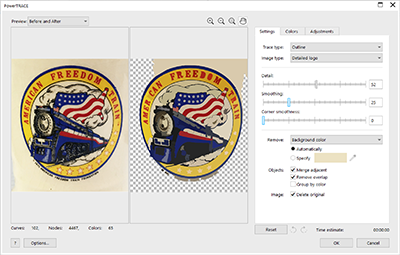
Figure I
The image in this experiment came from a photo I took recently of a souvenir mug, circa 1976 (FIGURE J). The image was cropped to avoid unnecessary objects created from the background.
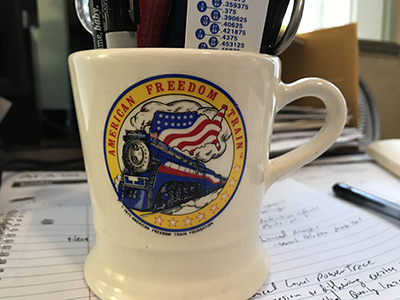
Figure J
The visual results in this experiment are shown in FIGURE K.
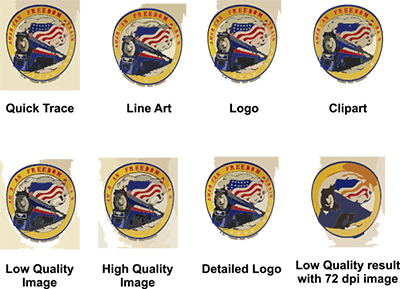
Figure K
Summary
Although I had never done an experiment like this before with an image, I found the results were as I had suspected. In most situations, I generally gravitate to using one of two options: the Quick Trace and the Detailed Logo. Quick Trace, although lacking in controls to modify results, does a decent job capturing most of the details of an image. The Detailed Logo option does a great job of rendering an image (usually beyond the level of detail required) and gives me control to adjust how much level of detail and color I need.
CorelDRAW 2020 currently offers more tools in the form of artificial intelligence to help produce better results for images that may be low quality or have JPEG artifacts in the image due to degradation and compression. These options (FIGURE L) include the JPEG Artifacts Removal and Upsampling (Illustration or Photograph).
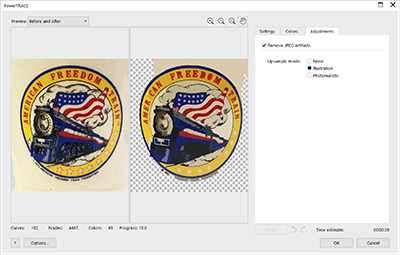
FIGURE L
More information can be found regarding the new features of version 2020 in the webinar “CorelDRAW 2020—An Overview,” archived on the APA website.
Shon Roti is the owner of 9th Street Designs, a sublimation & graphic design consulting & promotional products business. A graphic designer, Shon has spent more than two decades working as a production artist and instructor in the awards and promotional products industry. In 2014, ARA named him Speaker of the Year. You can find him at www.9thsd.com or contact him at shon@sublimationconsultant.com.
Are You Enjoying Inside Insights?
We invite you to explore more Awards and Personalization Association benefits. When you become a member, you will gain access to additional Insights Magazine articles along with innumerable resources that will help your business.