I’ve said it many times regarding CorelDRAW, “I use 10% of the program 90% of the time.”
This is true because some tools are essential, especially when working with vector objects. I do not know what I would do without the Weld, Trim, and Intersect tools—tools that have been a part of CorelDRAW since its inception.
In this tutorial, I will demonstrate how I’ve used these tools in a couple of projects. But honestly, I use them in almost every design project I do. If you are not familiar with them, this article will change the way you work in CorelDRAW forever.
Weld, Intersect, & Trim
Essential Tools for Vector Objects
By Shon Roti
I’ve said it many times regarding CorelDRAW, “I use 10% of the program 90% of the time.”
This is true because some tools are essential, especially when working with vector objects. I do not know what I would do without the Weld, Trim, and Intersect tools—tools that have been a part of CorelDRAW since its inception.
In this tutorial, I will demonstrate how I’ve used these tools in a couple of projects. But honestly, I use them in almost every design project I do. If you are not familiar with them, this article will change the way you work in CorelDRAW forever.
Part of my business (beyond supplying promotional products for my clients) is offering graphic design services. One of my clients hosts an annual poetry and music event called BadgerStock. In addition to creating the logo, I also created the posters for the event. FIGURE A is the poster title graphic that incorporated the logo (hat and beard). This graphic required the Weld tool.

Figure A
Weld Tool
The Weld tool combines two or more vector objects into one object. In FIGURE B, the text and logo are separate objects. Even the logo is separated into several parts, including the hat, beard, mustache, and registration mark. I’ve given them different colors to demonstrate this visually. The Weld tool can combine all of them with one click.

Figure B
To access the Weld, Trim, and Intersect tools, you must first have two or more objects selected. You will then find these tools in the property bar at the top of the workspace of under Object>Shaping (FIGURE C).
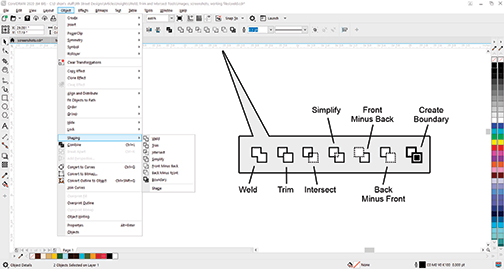
Figure C
With all objects selected, simply click on the Weld tool to join them. The before and after results are shown in FIGURE D.
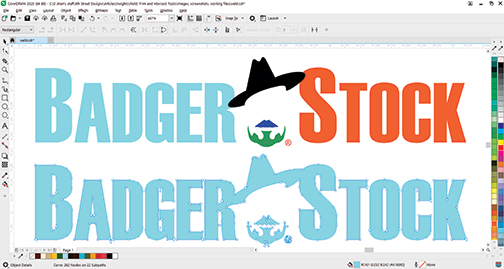
Figure D
One of the advantages of welding all of these parts together is the ability to quickly change the color of the entire graphic with one click of a palette color versus selecting each one individually prior to changing their color.
Intersect Tool
Another client of mine is new to graphic design software. She is in the process of starting a business selling pet products, including sublimated ornaments and pet tags. I was hired to create some designs that were templated and easy to use for a novice graphic user. FIGURE E represents one of those designs. Among other tools for this design, I used the Trim and Intersect tools to get to a final product.
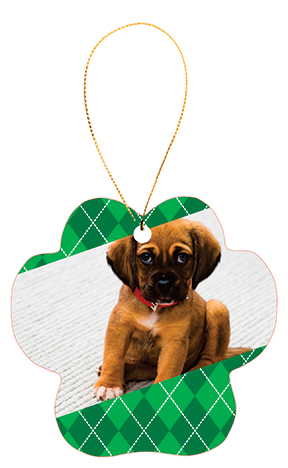
Figure E
Like the Weld tool, the Intersect tool cuts out one or several vector objects at once. But the Intersect tool operates much like a cookie cutter through cookie dough. In FIGURE F, there are many vector elements—the pet ornament template (colored white) and the argyle pattern beneath— that are composed of many vector objects grouped together.

Figure F
To cut out all the argyle objects to the shape of the ornament, I first selected the vector object above (pet ornament) and then held the shift key down and selected the grouped argyle objects below. Then, I clicked the Intersect tool to “punch out” the shape of the ornament (FIGURE G).
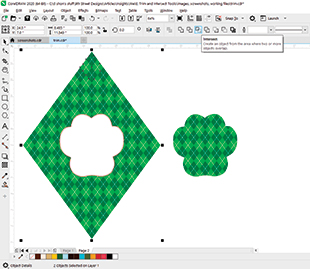
Figure G
I also could have used the PowerClip tool to mask the argyle pattern into the ornament shape, but there were a couple of reasons I did not employ this effect: the final graphic file will be easier for my client to use, and I will worry less about a PowerClip effect translation issue from CorelDRAW to Adobe Illustrator.
Trim Tool
The next step in the design requires cutting out a space that will be the “window” for the pet photo. The Trim tool is perfect for this.
I created and rotated a rectangle shape and placed it over the top of the ornament graphic. With the rectangle selected, I then shift-selected the ornament and clicked the Trim tool to remove that area (FIGURE H).
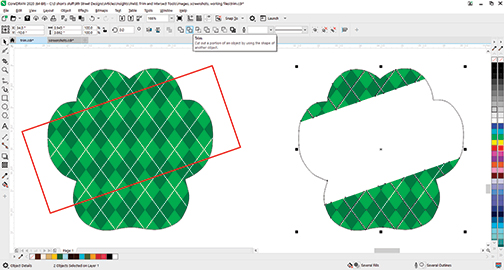
Figure H
Once this was completed, I added some text that could be edited by the customer for name changes. Now all the client has to do is import an image and place it behind the graphics and she is ready to print and sublimate.
There are additional tools in this property bar—Front Minus Back, Back Minus Front, Simplify, and Create Boundary. The first three of these operate similarly to the Trim tool but the result will depend on what is in front versus what is behind rather than the order of what is selected. The Create Boundary operates like the Weld tool, but it will keep the original pieces in addition to creating the new welded object.
After having some time to experiment, you may find, as I do, that these tools are truly essential.
Shon Roti is the owner of 9th Street Designs, a sublimation and graphic design consulting and promotional products business. A graphic designer, Roti has spent more than 2 decades working as a production artist and instructor in the awards and promotional products industry. In 2014, the Awards and Personalization Association named him Speaker of the Year. Find him at 9thsd.com or contact him at shon@sublimationconsultant.com.