Producing industrial nameplates with incremented serial numbers is hardly the most creative project to work on, but many retailers do find it extremely profitable. That’s because the customers who require this type of engraving typically are interested first in quality and timely delivery and consider price a secondary or even tertiary concern. We know we can produce a quality product and we’re experts at managing our schedules, so this seems like a perfect fit.
How To: Master Serialization in CorelDRAW
Make Industrial Projects More Profitable with One Easy Tool
By Roy Brewer, CRM, Engraving Concepts
(Originally published in the December 2018 issue of Insights)
Producing industrial nameplates with incremented serial numbers is hardly the most creative project to work on, but many retailers do find it extremely profitable. That’s because the customers who require this type of engraving typically are interested first in quality and timely delivery and consider price a secondary or even tertiary concern. We know we can produce a quality product and we’re experts at managing our schedules, so this seems like a perfect fit.
However, there often is one problem: the scale, difficulty, or even just tediousness of the project definitely can make it seem daunting. But I’m here to show you that with these tips—and with a bit of practice—CorelDRAW can help make this type of task child’s play. Equipment manufacturers, integrators, electrical contractors, and more always are looking for dependable suppliers for this of type engraving—so why not give them what they want and benefit your business? You may even find that after landing this type of work, you’ll start needing to make a few extra trips to the bank.
There will be slight differences in exactly how you execute the task of serialization, depending on which version of CorelDRAW you are using. All of the screenshots I share here show the process in CorelDRAW2018 (aka, version 20), but you should be able to use these steps regardless of the version you have because very few changes have been made in the Print Merge Wizard over the years.
This tutorial uses CorelDRAW’s Print Merge function to add only the serial number, but you could include really anything you like using an Excel worksheet or an e-mailed list of required data. Check out the YouTube videos in the sidebar on the right to learn more about the capabilities of CorelDRAW’s Print Merge function.
- Create a layout, including sample text—which later will be replaced by your serialized data—in the appropriate size, font, justification, and placement. (See Figure 1 for an example of a layout.)
Note: You typically would want your sample text and resulting serial numbers to be left-justified, but this may change based on the requested or desired layout.

Figure 1
- Select File > Print Merge > Create/Load Print Merge > Create New Text > Next to bring up the second page of the Print Merge Wizard (see Figure 2).
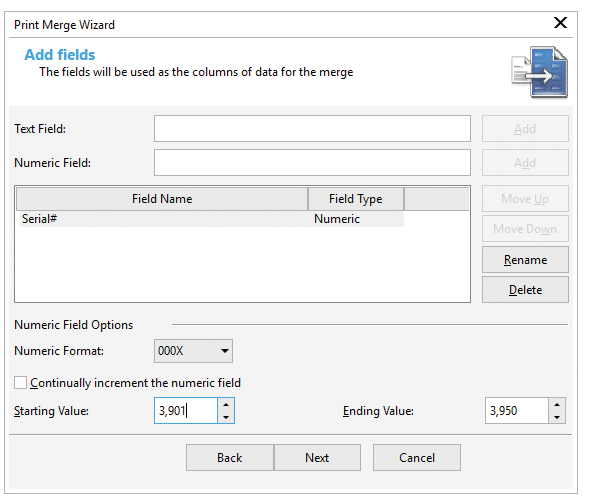
Figure 2
- In the Print Merge Wizard, type something like “Serial#” in the Numeric Field to represent the serial data that will be uploaded.
- Click the Add button to right of the field to add your new entry to the Field Name list.
- Click on the “Serial#” record in the Field Name list to highlight it, which will activate the Numeric Field options. These will appear at the bottom of the dialog box (see Figure 2).
- Select an appropriate format of the serial number from the Numeric Format list box.
- In most cases, you will want to deselect the checkbox labeled “Continually Increment the Numeric Field.”
- Type in the first serial number from your data set.
- Type in the last serial number from your data set. Your Wizard dialog box should look similar to Figure 2.
- Click Next to bring up the Wizard’s next window, which you can see in Figure 3. For this example, no additional editing is needed on this page, so click the Next button to call up the final page of the Wizard (see Figure 4).
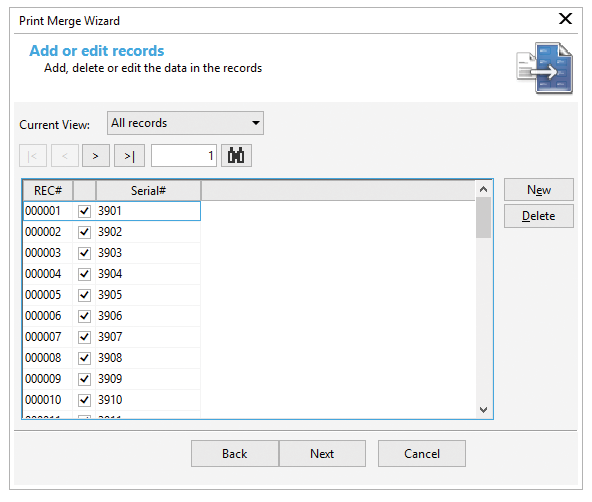
Figure 3
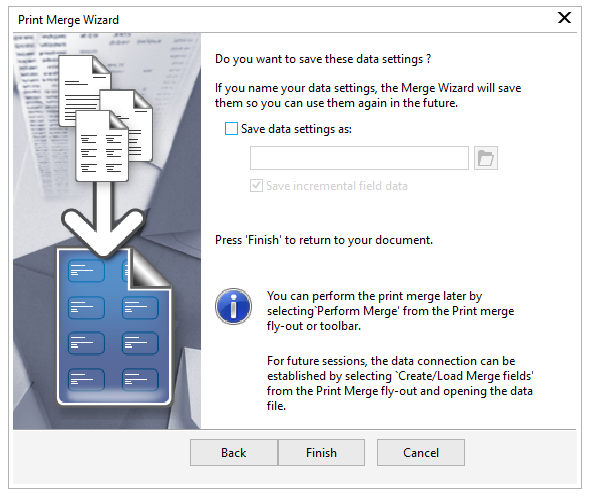
Figure 4
- You will not need to make changes on this page either, so click the Finish button to dismiss the Wizard and automatically place the Print Merge toolbar onto your main CorelDRAW layout screen (see Figure 5).

Figure 5
Note: After you exit the Wizard, the Print Merge Toolbar sometimes gets placed on top of the Property Bar, making it difficult to see; you can drag it to a more visible or useful position on the screen using your mouse.
- Now that we are back in your layout, use the Text tool to select the sample text that represents where the serial number will go (see Figure 6).
Note: In step 12, the sample text cannot be just “selected”; it must be “sweep” selected using Text tool.

Figure 6
- Clicking the Insert Print Merge Field from the Print Merge toolbar (see Figure 5) will automatically insert your placeholder text over the sample text you created in the first step; note that the placeholder text will have brackets (< >) on each side (see Figure 7).

Figure 7
- You’re now ready to do the actual merge. Select Merge to a New Document from the Print Merge toolbar (see Figure 5).
- A new document, named PrintMerge 1, will be generated. It should contain a separate page for each plate to be engraved (see Figure 8 for an example of page one of 50 pages in this newly created document).
Note: CorelDRAW will automatically create tabs for each of the 50 plates, which you can access at the bottom of your workspace. This will enable you to view and adjust each individual plate, if needed, before printing.

Figure 8
If you’re lasering one part or plate at a time, send one page to the laser at a time. If you’re printing multiple plates in a matrix, use the Imposition tool to set up your “across & down” matrix (see Figure 9 for an example of an Imposition Layout with three fields across and four down).
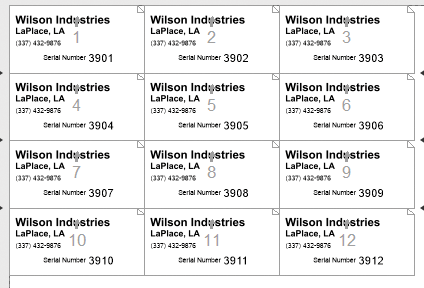
Figure 9
Roy Brewer, CRM, is the founder of Engraving Concepts. Brewer is a longtime CorelDRAW teacher, through his company, the Awards and Personalization Association, and many other forums. He has earned multiple Gold Obelisk awards for his work, and Engraving Concepts recently was recognized as the 2017–18 Supplier of the Year—Multiple Locations. Visit www.engravingconcepts.com to learn more.