When thinking about cities like Las Vegas, New York, and Tokyo, images of stunning, eye-catching signage often spring to mind. More and more we are seeing brightly lit displays being used to create unforgettable messages for advertising as well as simpleambient appeal for restaurants, galleries, and even modern home décor.
Use UV-LED Printing to Create Unique Signage
"HIDDEN" IMAGES APPEAR ONLY WHEN DISPLAYS AND SIGNS ARE BACKLIT
BY SUSAN COX, LOGOJET
(Originally published in the December 2017 issue of Insights.)
When thinking about cities like Las Vegas, New York, and Tokyo, images of stunning, eye-catching signage often spring to mind. More and more we are seeing brightly lit displays being used to create unforgettable messages for advertising as well as simple ambient appeal for restaurants, galleries, and even modern home décor.
An innovative technique that is gaining popularity is the concept of designing day/night prints that incorporate not just one style or message, but two—from day to evening. The concept involves printing additional layers of artwork, which are revealed only when a backlight is activated. The image displayed during the day is front-lit by natural lighting, while a white barrier in between printed layers separates a more complex and color-dominant "hidden" image waiting for its evening debut. You can use this hidden layer to display text, change colors, or add more visual effects to your design.
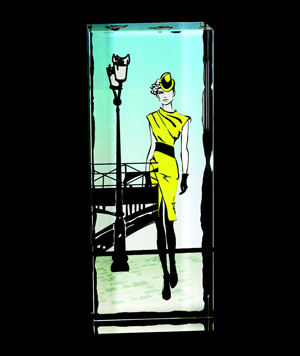
FINISHED PRODUCT, DAY
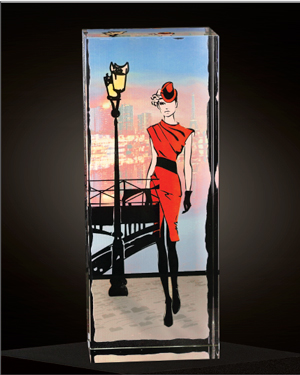
FINISHED PRODUCT, NIGHT
STEP 1: SELECTING A MATERIAL
The day/night effect can be attained on a variety of transparent materials including, but not limited to, glass, clear acrylic, polycarbonate, and other clear plastic materials. The key is having a nice, clean, flat surface on which to layer your prints. UV printing technology offers the ability to print more than one layer at a time, resulting in perfect registration, which is a major key to achieving a stunning day/night transition.
STEP 2: CREATING ARTWORK FOR YOUR BACKLIT SIGNAGE
This can be the tricky part, but here are a few tips that can help. When designing in a program such as Adobe Photoshop or Illustrator, you can place artwork on separate layers, which allows you to easily register portions of the day and night artwork. If you design your artwork for day and night within the same file, you can set the Transparency of your layers to "Multiply" to preview how the images will look once the backlight is turned on.
Once your design is finalized, just hide unnecessary layers before exporting each of the two separate day and night files for printing. The "daytime" image should be simple, with areas of plain color that will provide a base for your "nighttime" details to show through. Keep in mind that all creative elements used in the daytime artwork will remain visible when the backlight is applied, so you need to account for this. For example, the solid yellow in the dress of our daytime image (FIGURE A) will combine with the magenta dress in the nighttime image (FIGURE B), resulting in a RED dress (FIGURE C). The black vector outlines on the daytime image will remain visible when the sign is backlit, so there is no need to include these elements in the nighttime artwork.
You can use photographic or vector images to build your artwork or combine elements of each for a creative touch. In our example, a simple vector image with black outlines and areas of solid color was used for the daytime artwork. The nighttime artwork incorporates a photographic image of a city at night, along with some bursts of color in the lanterns and some shadowing on the street.
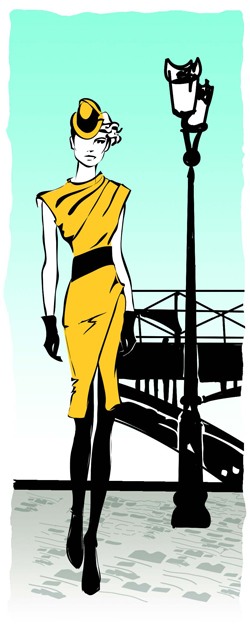
FIGURE A
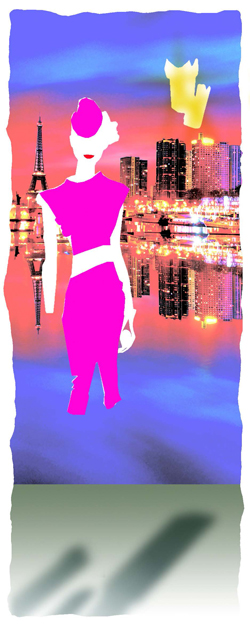
FIGURE B

FIGURE C
STEP 3: PRINTING LAYERS ONTO SUBSTRATE
Now that the file has been created and the day and night layers are perfectly aligned, the next step is to sandwich them together on your substrate with a translucent, but still dense, white layer in between (FIGURES D & E). The key is to provide enough opacity to obscure the nighttime artwork during the day, while still permitting the backlight to shine through at night—this is the perfect balance.
With clear substrates, it’s best to print artwork on the back side to provide added protection from the elements. Because layers are printed on the back, the image will need to be mirrored or flipped—especially if there is any text in the design. This can be done using either the RIP software or within the design software used to create the images. As illustrated in the diagram in FIGURE F, you will print your mirrored daytime image first in color only, followed by a solid white layer, and lastly your mirrored nighttime artwork in color only.
Once printed, good lighting and proper location are key to showcasing your display. Safe and energy-efficient LED lighting is recommended, but you also can experiment with other types of lighting to find the best overall luminescence and color balance when your backlight is activated. These eye-catching and long-lasting displays can be easily produced using UV-LED printing technology.
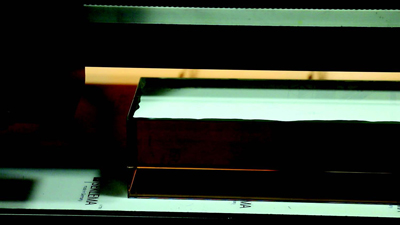
FIGURE D
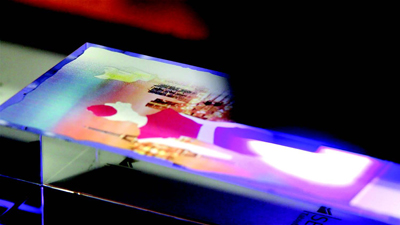
FIGURE E
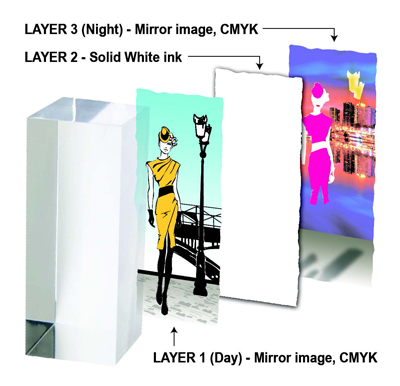
FIGURE F
Susan Cox is president of LogoJET, a business she founded 12 years ago located in Lafayette, LA. An early pioneer in direct-to-substrate printing, LogoJET was named to the Inc. 5000 for the last 3 years and has posted a 4-year growth rate. LogoJET printers serve a wide range of industries, including promotional products, signage, home décor, gifting, industrial labeling, packaging, and food products. LogoJET printers are even used to print on edibles such as cookies, candy and marshmallows, and yes, cannabis. Cox is a member of the Acadiana CEO roundtable and is a member of many printing association organizations. She also is a frequent speaker at industry trade shows. Originally from Toronto, Canada, Susan relocated LogoJET to Louisiana 6 years ago. For more information and tips, visit www.LogoJET.com.