I’ve been creating ADA-compliant signage since the passage of the Americans with Disabilities Act (ADA) in 1990. Compliance requirements have evolved, but one thing stays the same: few markets available to personalization retailers are as expansive as that for ADA-compliant signage.
Setting Up Shop: ADA Signage
By Jimmy DuBose, Engraving Concepts
I’ve been creating ADA-compliant signage since the passage of the Americans with Disabilities Act (ADA) in 1990. Compliance requirements have evolved, but one thing stays the same: few markets available to personalization retailers are as expansive as that for ADA-compliant signage.
The act requires that most buildings open to the public—from restaurants, casinos, and hotels to fire departments, state legislatures, and universities—display compliant signage. That’s one massive market, both here and across the globe, looking for the unique services offered by our industry. But where do you begin when looking to integrate Braille signs into your product lineup?
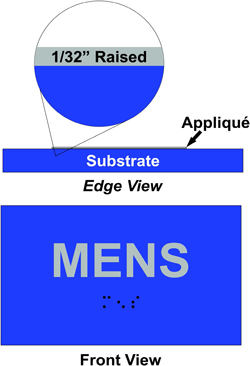
FIGURE 1
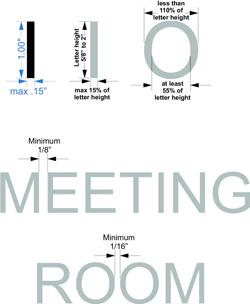
FIGURE 2
ADA REQUIREMENTS
When we think of ADA-compliant signage, we initially think only about the required Braille. Much more is required for these products—including specific depth, case, style, and proportions of typography; and color contrast and finish—because these signs help people with any level of visual impairment.
Typography and Character Spacing
One particular consideration for ADA-compliant signs is the typography. Clean, consistent type is imperative.
According to ADA regulations, signs must use only uppercase letters in a sans serif font because they are easier to discern by feel or sight. (Like the pictogram applique in Figure 1, the letters must be raised 1/32 in. from the top of the sign’s substrate to aid finger recognition.)
The characters also must follow specific rules for their height, spacing, proportions, and thickness. Each must be at least 5/8 in. and no more than 2 in. tall, and the stroke must be no more than 15% of the capital I in the font.
Ensuring these dimensions is pretty straightforward, but it’s a bit more complicated to ensure the stroke thickness and character proportions are compliant. It’s easiest to judge this with an uppercase O: On an ADA-compliant sign, the width between each exterior edge of the letter O should be less than 110% of the letter height, and the width between each interior edge must be at least 55% of the letter height. See Figure 2 for an example of this.
Use the O again to verify character spacing. Consecutive rounded characters—like the O’s in ROOM—must have at least 1/16 in. of space between them. Side-by-side characters with angled corners—such as the E’s in MEETINGS—must have at least 1/8 in. of space between them.
Make sure the gap between the baselines of each line of text is between 135% and 170% of the line height (Figure 3); I like to use a capital I to judge this distance.
Braille and Pictograms
There are two versions of Braille—Grade I and Grade II (see Figure 4). The United States requires Grade II Braille, which contracts the words. Grade I, which is a letter-to-letter translation with additional characters to designate case, is used for tactile signage in some other countries, including Australia. If your signs will be used outside of the United States, verify the requirements for each country. Get Duxbury DBT software, the industry leader for Braille translations with Grade I and Grade II translation in more than 100 languages. If your software includes a Braille translator, verify that it uses Duxbury to ensure your signs are readable.
The placement of the Braille is important. Braille should be directly beneath the text it translates and must be at least 3/8 in. from any raised borders and the edge of the sign. Your software will handle the size, shape, and spacing of the Braille dots. These dots must be domed, but the law only gives us the dot’s base diameter and height. Rotary engravers can route through a substrate to leave raised dots, but the dots must be domed using a special cutter. Flat-top dots never are compliant.
Signs must display a compliant pictogram in a space at least 6 in. tall that does not include any Braille or raised letters (see Figure 5). The ADA specifies international symbols for pictograms, but check with the government in the area your signs will be displayed to ensure they don’t mandate a different symbol—like the “active” wheelchair symbol New York uses.
Color, Contrast, and Finish
The color, contrast, and finish of the sign are strictly regulated to assist people with visual impairment. The regulation previously specified color contrast of at least 70%. The 2010 update only requires that the letters and pictograms contrast with the background color (light on dark or dark on light, for instance). The finish must be matte or nonglare, even if the client or architect prefers shiny signs.
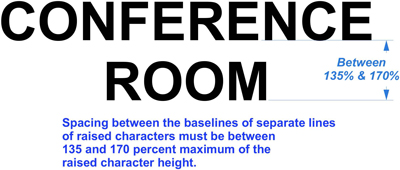
FIGURE 3
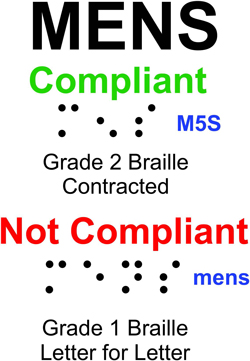
FIGURE 4
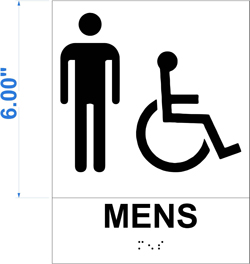
FIGURE 5
METHODS
Although there are a few industry favorites, there are several different methods for creating Braille signage! Regardless of which you choose, however, it’s important to know the pros and cons of each.
Photopolymer Processes
Some large-scale ADA signage distributors use this method, but we don’t suggest it. To create rounded Braille dots, you must design the image with various layers of shading to make the flat-topped dots appear round—though they won’t be compliant if they aren’t truly rounded. The resulting sign is less durable than those created by other methods. Initially, this process can be time consuming, but it can be sped up once an automation process is developed. Photopolymer is good for color matching.
UV-LED Printing
As UV-LED printing is adopted by more retailers, this method for creating Braille signage will become common. These direct-to-substrate printers layer polymer ink, curing it with a UV lamp. Direct Color Systems has patented the process of UV-LED printing ADA-compliant Braille, with DCS printers able to print the Braille, raised text and pictogram, and substrate color in a single, relatively quick process. Talk to your manufacturer about your options and about their ink’s long-term stability in sunlit applications.
CO2 Laser Engraving
This is among the easiest and most common processes for creating Braille signage—and it uses equipment that many retailers already have in house! To get the rounded dots required by the regulations, retailers would need to precut spaces for each Braille letter with the laser then manually place Raster beads into each hole. One downside is that holes created with the laser engraver often are smaller at the top than at the bottom, resulting in inconsistent bead heights at the surface and the occasional loose bead. This is a simple problem to fix with some adhesive, but that does create another step.
Another problem many people face with this method, rotary engraving, and the Raster method is vandalism of the signs. With enough time and effort, the raster beads can be pried out of their holes, leaving gaps. Many retailers have developed innovative solutions to help mediate that problem, but that’s a (lengthy) topic for another article!
Rotary Engraving
Nearly every step necessary to create an ADA-compliant Braille sign can be done on your rotary engraver. However, if you cut out your raised letters and pictograms with your rotary engraver, you’ll spend a lot of time cleaning up (potentially with WD-40 and a fine-bristle brush). That makes this a more time-consuming method, especially when handling large orders. The rotary engraver is unique in that it offers you multiple options for creating the Braille.
Some engravers choose to route out the substrate, leaving the raised dots at the correct height from the new background around it, but you’ll need a special cutter to round the top of the dots; the compliance of routed Braille may be challenged, though the ADA doesn’t specifically forbid it. For a faster process and more attractive sign, use your rotary engraver to create Braille by drilling holes and inserting Raster beads. Some retailers prefer to use the engraver to drill then use the Raster bead “pen” to manually insert the beads.
Rotary Engraving and CO2 Laser Engraving
The most popular method and the one I suggest, uses both the laser engraver and rotary engraver. Use your laser to cut the sign to size and to cut the pictogram and letters from sticky-backed substrate. Then, use your rotary engraver to drill your Raster bead holes. Insert the beads using your rotary engraver’s attachment or do it manually.
Continued Demand
Though the ADA was enacted 27 years ago, the demand for signage is still great. Signs are needed for newly constructed buildings, facilities that are remodeled or renovated, and rooms that change functions, such as becoming an office instead of a meeting room.
The result? An enduring demand that is perfect for retailers who can make attractive, accurate signs.
Jimmy DuBose has worked in the engraving and sign industry since 1989, during which time he has worked as production employee and manager for an industrial engraving shop, as well as in customer service and sales at Xenetech Engraving Systems for 18 years. For the last 3 years, DuBose has been managing the Houston sales office for Engraving Concepts, an Epilog Laser Dealer, where he provides training, service and sales for customers using Epilog laser systems.