I’m not a professional photographer. And like most of us, I’ve had to make the best of less-than-perfect photos. Over the years, I’ve spent plenty of time fixing issues like poor lighting, low resolution, sun flares, blurriness, and red eyes. Unless your images were taken by a pro with high-end gear, chances are they’ll need a little help before they’re ready for print or design.
By: Shon Roti
(Originally printed in the September/October 2025 issue of Insights.)
Most photos taken today are, in fact, captured with cell phones. And although camera technology in phones continues to evolve, these photos often still need help (especially mine). Whether it’s a photo plaque, ceramic mug, T-shirt, or fridge magnet, the product is only as good as the image that is on it.
The number of issues that can affect photos—and their possible remedies—could fill a thousand-page manual. So, I’m going to focus on just one of the most common problems I deal with daily—atmospheric haze—and the Photoshop tools I use to combat it.
Dust, moisture, smoke, and other particles contribute to atmospheric haze. This effect is especially noticeable in outdoor photos taken on hot, humid days, where a bluish-gray color cast often appears. Distant objects can look foggy and faded, and the overall color saturation is reduced.
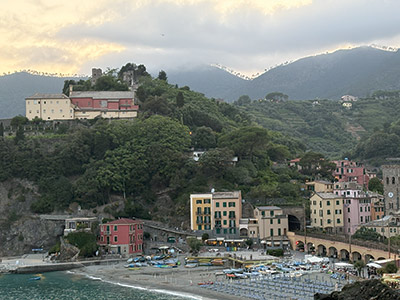

Figure A and Figure B
The landscape of Cinque Terre, Italy, shown in figures A and B illustrates the haze effect before and after applying Photoshop fixes.
This tutorial was created using Photoshop CC, but the tools demonstrated—the Camera Raw Filter and Blend Modes—have been available since Photoshop CC 8.1 (June 2013) and Photoshop 1.0 (1990), respectively.
The Quick Fix: The Camera Raw Filter
The Camera Raw Filter almost never fails me and can make most of my photos look like I’m using a much better camera than my iPhone 12. One benefit of using this filter is that almost all the adjustments you will need are in one dialogue box. Because this filter’s effects are destructive (will change the original image), I recommend duplicating the layer (Ctrl+J or Cmd+J on a Mac) and applying these adjustments to the duplicate layer.
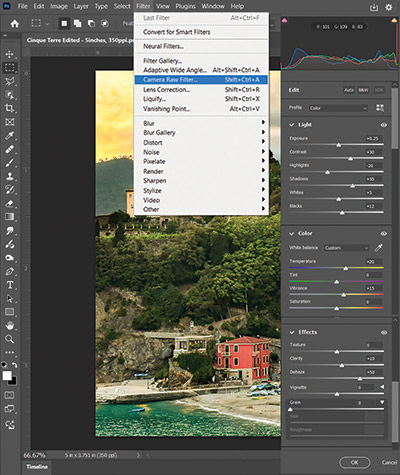
I use some of the filter adjustments more often than others. For tackling the blue-haze problem, one adjustment is indispensable: Dehaze. This adjustment instantly removes most of the haze and does so without causing a lot of negative side effects. To find this adjustment, go to Filter > Camera Raw Filter (figure C) under the Effects submenu. Like the other adjustments in this filter, it has a slider to control the amount of the effect in both a positive and negative direction.
I mentioned there are not many side effects from this adjustment, but there are some. When using the Dehaze adjustment to combat the haze, it tends to darken the photo, sometimes too much. Fortunately, the adjustments you need to counter this effect (Exposure, among others) are also in this dialogue box.
Below are all the adjustments and the settings used to remove the blue haze from this photo and improve the overall image, along with a description of their effects.

Dehaze +50
Controls atmospheric haze. This is the first setting that I use to remove the blue haze.
Exposure +5
Controls overall brightness (and counters the Dehaze adjustment). A little of this adjustment goes a long way. Be careful not to overexpose your photo.
Contrast +30
Controls how much separation there is between the dark and light areas of an image.
Highlights –20
Targets brighter areas of the image. By lowering this adjustment, details can be recovered from the very light areas.
Shadows +35
Adjusts the darker areas of the image. Moving the slider in the positive brings out details from the shadows.
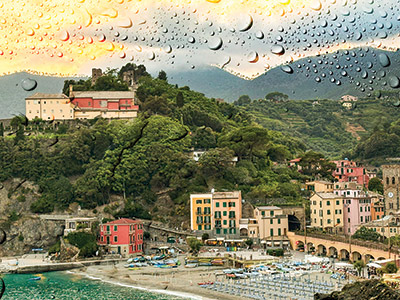
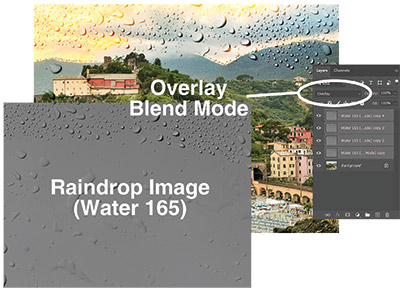
Figure E
Whites +5
Specifically targets the brightest tones. Increases high-end brightness or can recover details in blown-out white areas of the image.
Blacks +12
Targets the darkest tones. Reveals details in the shadows or darkens and adds more contrast.
Temperature +20
Adjusts the white balance from cool to warm and is very useful to counter the blue cast created from the blue atmospheric haze.
Vibrance +15
Adjusts the intensity of the colors. This is like the Saturation adjustment, but its effects are much more subtle.
Clarity +10
Controls midtone contrast, texture, and sharpness. This will help clear the fogginess of the blue haze.
Keep in mind that these settings won’t work for all photos, and the results are subjective. Some experimentation will be needed to achieve the desired effect. And, while the Camera Raw Filter is a super-useful tool, its adjustments affect the image as a whole. The next set of steps allows for a more surgical approach to improvements.
The Deep Dive: Overlay and Soft Light Blend Modes
Even after applying the Camera Raw Filter, a significant amount of haze remains in the mountains in the background. The next set of steps—although a bit unconventional—are highly effective tools and techniques for addressing challenges in specific areas of a photo.
What Are Blend Modes?
Blend Modes control how two layers—the one beneath and the one directly above—interact with each other. They determine how hues and tones blend together based on mathematical formulas. Blend Modes are often used to enhance contrast, combine textures, adjust lighting, or create artistic effects. Overlay and Soft Light belong to the Contrast category of Blend Modes.
Both Overlay and Soft Light Blend Modes add contrast, but Soft Light is more subtle, while Overlay creates a more dramatic effect. Because Blend Modes are applied on separate layers, they are nondestructive and do not alter the original image.
When a Blend Mode is used with a desaturated image (only gray tones) above the original photo, the hues will not change—only the tint and shade of the original color will change visually. Grays at 50% value will have no effect at all. Grays with a value less than 50% will lighten, and gray values above 50% will darken.
To best illustrate what these Blend Modes can do, see figure D. Here, a grayscale image composed of raindrops has been added to the layer above the photo and set to Overlay at 100% opacity. That Blend Mode layer was then duplicated several times to magnify the effect (figure E).
Note: The raindrops image file, called Water 165, is a free download from texturelabs.org.
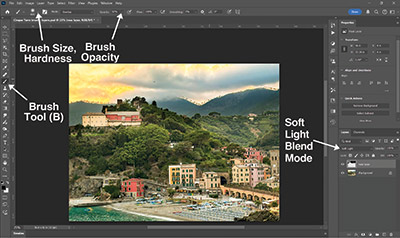
To target and fix specific areas of the image, the Brush tool—set to either white or black—can be used to paint over challenging spots (such as the furthest mountains in the background) to add contrast and clarity and further reduce the blue haze.
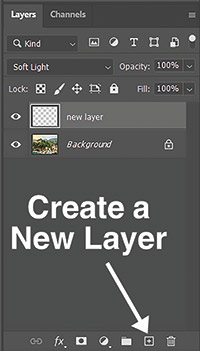
To do this, create a new layer above the original by clicking the Create a New Layer button, (figure F) or use the shortcut Ctrl+Shift+N or Cmd+Shift+N on a Mac. Select the paint brush from the Tools panel (B) and set the Hardness slider to 0% and the size appropriate to the area being fixed. Change the paint color to black (for contrast), and set the new layer to either Overlay or Soft Light mode (figure G). Start clicking and dragging with the Brush Tool (B) in the new layer over the foggy mountains. The change will be immediate and satisfying, especially with the amount of control that these tools have.
Adjust the Brush opacity as needed (I started with a value below 50%) and fine-tune the overall opacity of the Blend Mode layer for a subtler effect.
Fixing photos doesn’t require years of Photoshop experience—just a willingness to experiment. The combination of the Camera Raw Filter and Blend Modes offers easy, broad fixes and precise control, allowing for mitigation of the atmospheric haze and other common image issues. Each photo will call for different settings, but these techniques provide a solid foundation for enhancing your images. In time, turning hazy snapshots into impactful images will be a breeze.
Shon Roti is the owner of 9th Street Designs. Shon has more than 25 years of experience as a production artist, graphic designer, and instructor in the awards and promotional products industry. In 2014, ARA named him Speaker of the Year. Contact him at [email protected].